Archive for the ‘Friends of Ivan Richards Audio’ Category

Fender Jaguar (reissue) with wiring issues

July 2, 2017

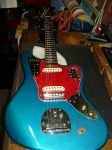
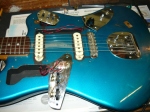
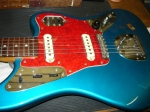
a Jaguar on the bench

Hello again. As a bit of a departure from talking about amps & pedals, this week we talk about service & repairs to solid body electric guitars. To be more specific, a Fender Jaguar made-in-Japan reissue (serial # N070078), which was recently delivered to the workshop by regular customer Hannes Leak. We have been repairing, rewiring, upgrading pickups and so on, to solid body electric guitars for many years – however, this is the very first time we have struck a Fender Jaguar (or even played one), so they have been a bit of a mystery until now.


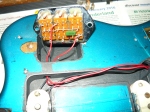
accessing the Jaguar controls

Hannes had recently acquired this instrument on the 2nd hand market, however it appeared that the switching & controls were not functioning. To a Jaguar novice, the arrangement of controls is somewhat confusing – there are four slider switches and two sets of volume & tone controls – none of this is actually labelled so you have to read up on Jaguars to understand the intended functionality.


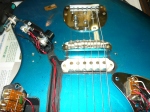
the Jaguar pickup selector switches (plus mysterious tone switch)

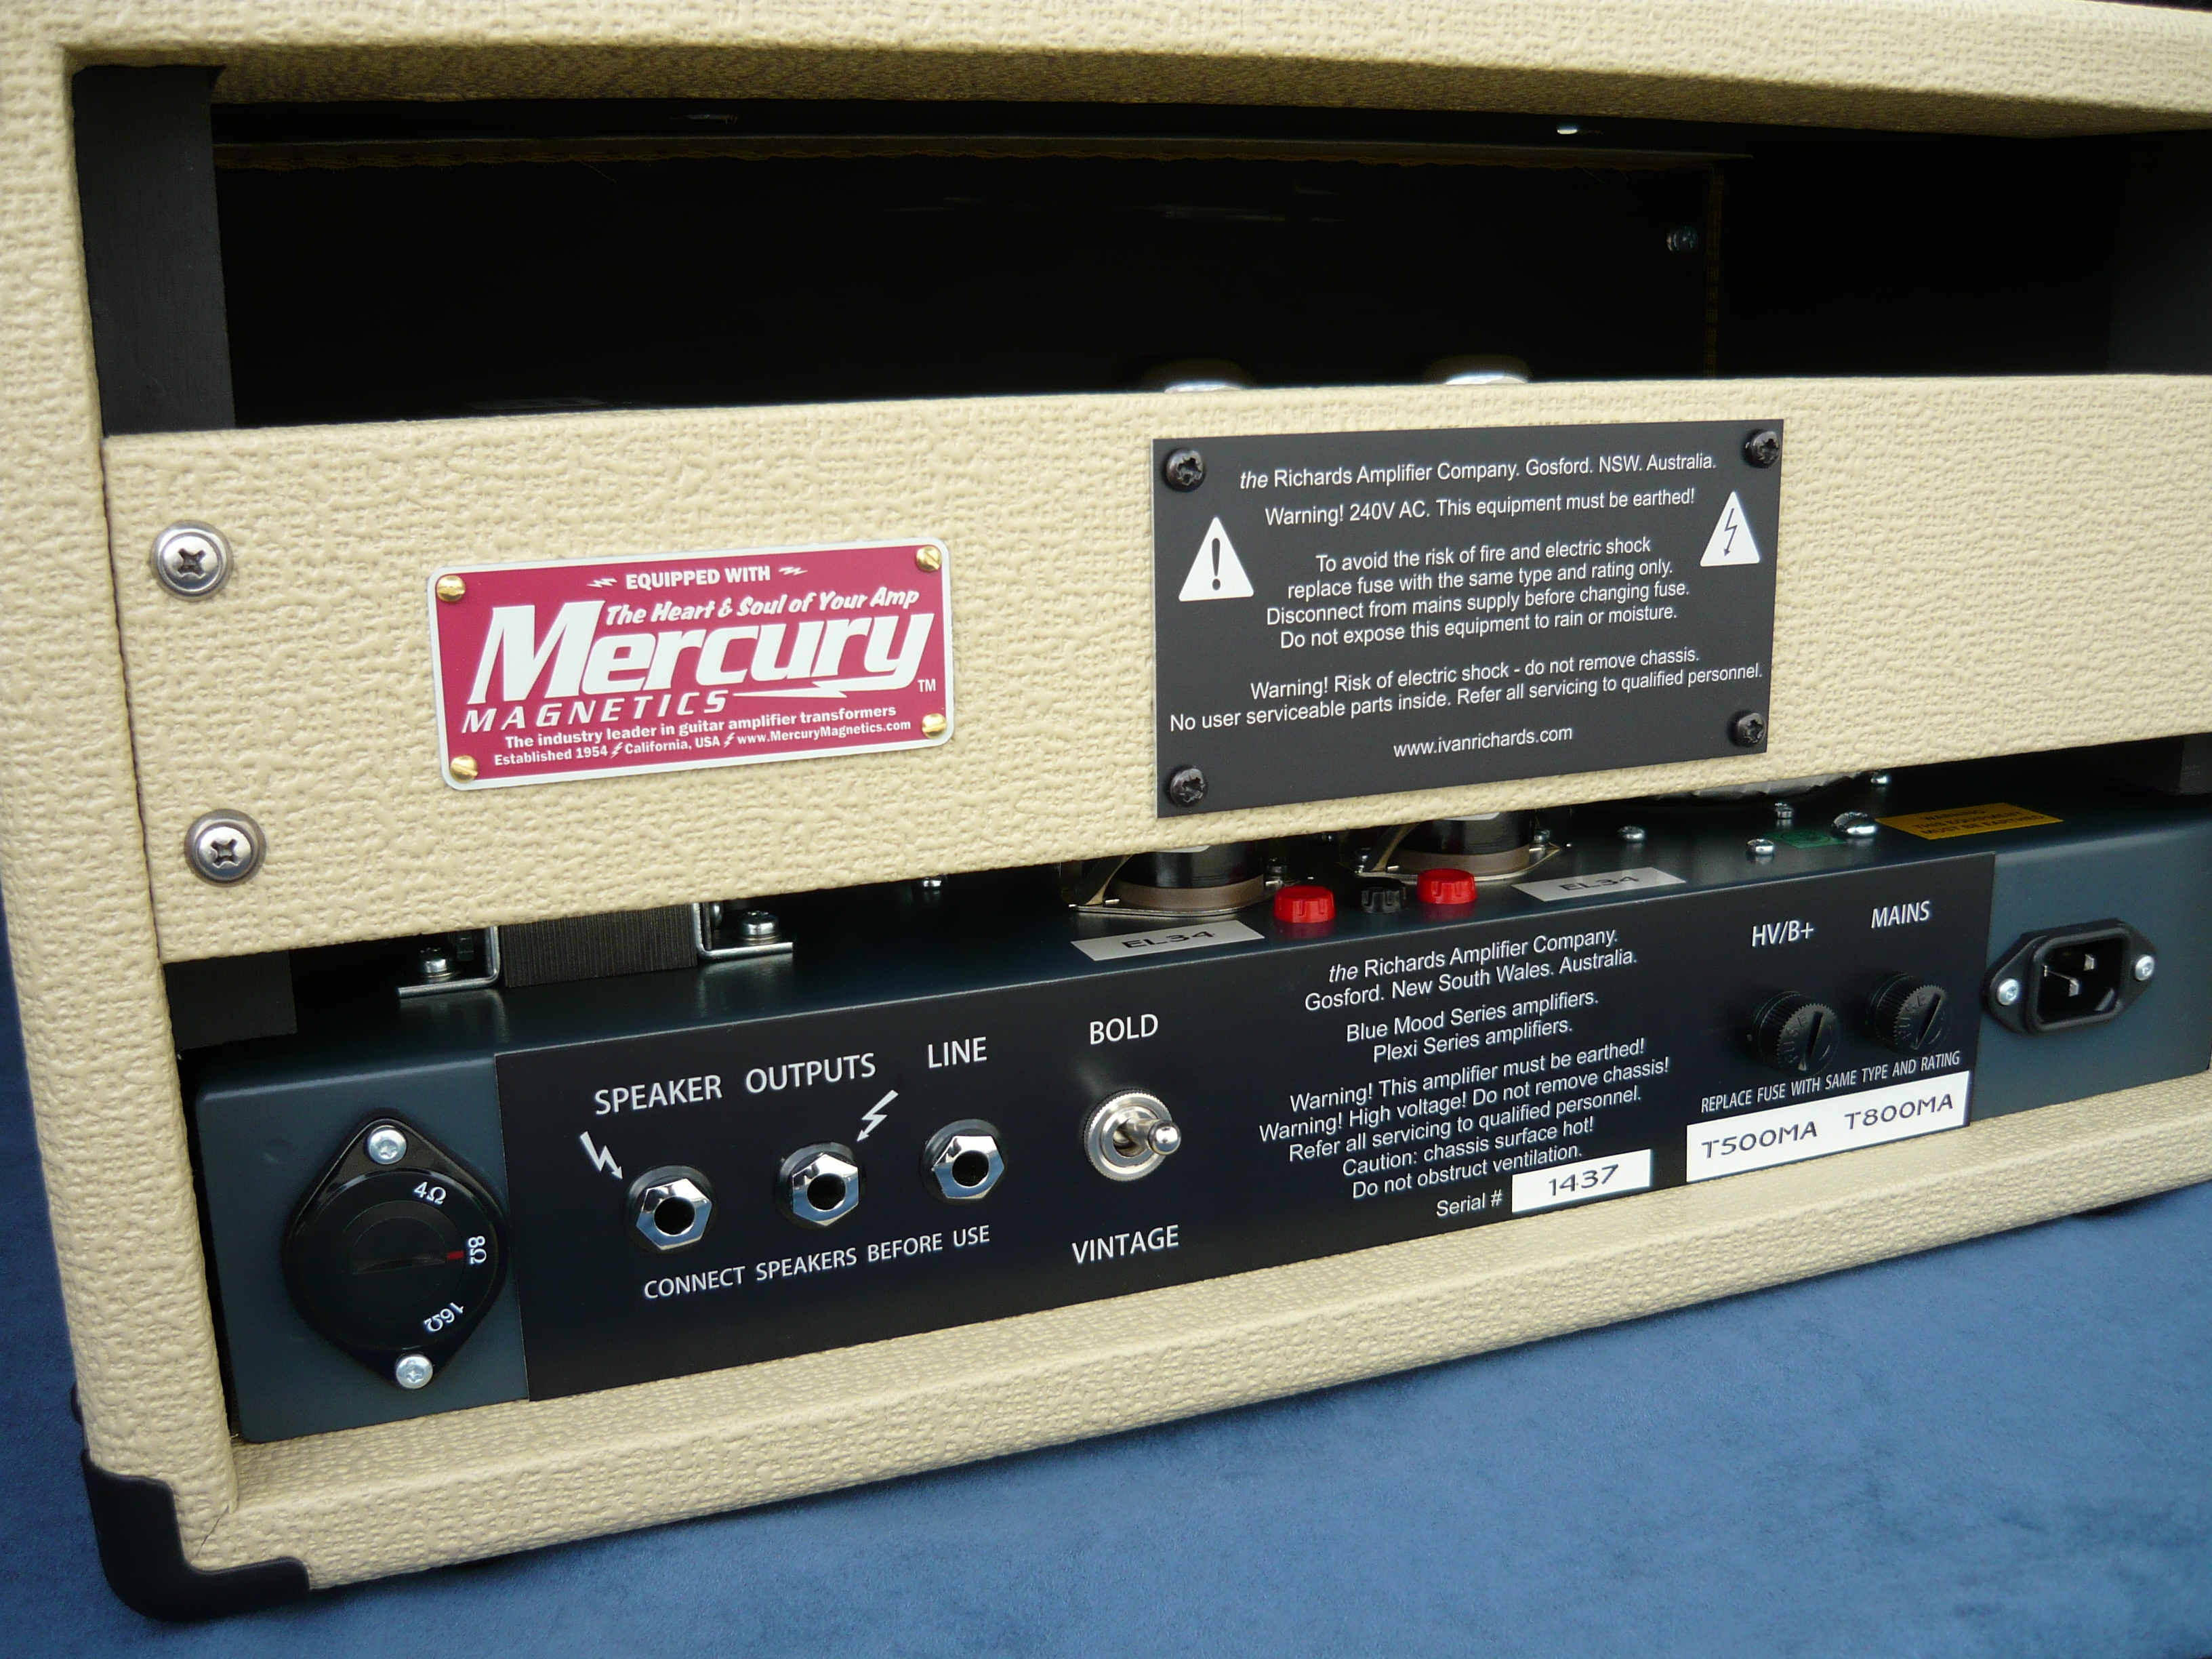
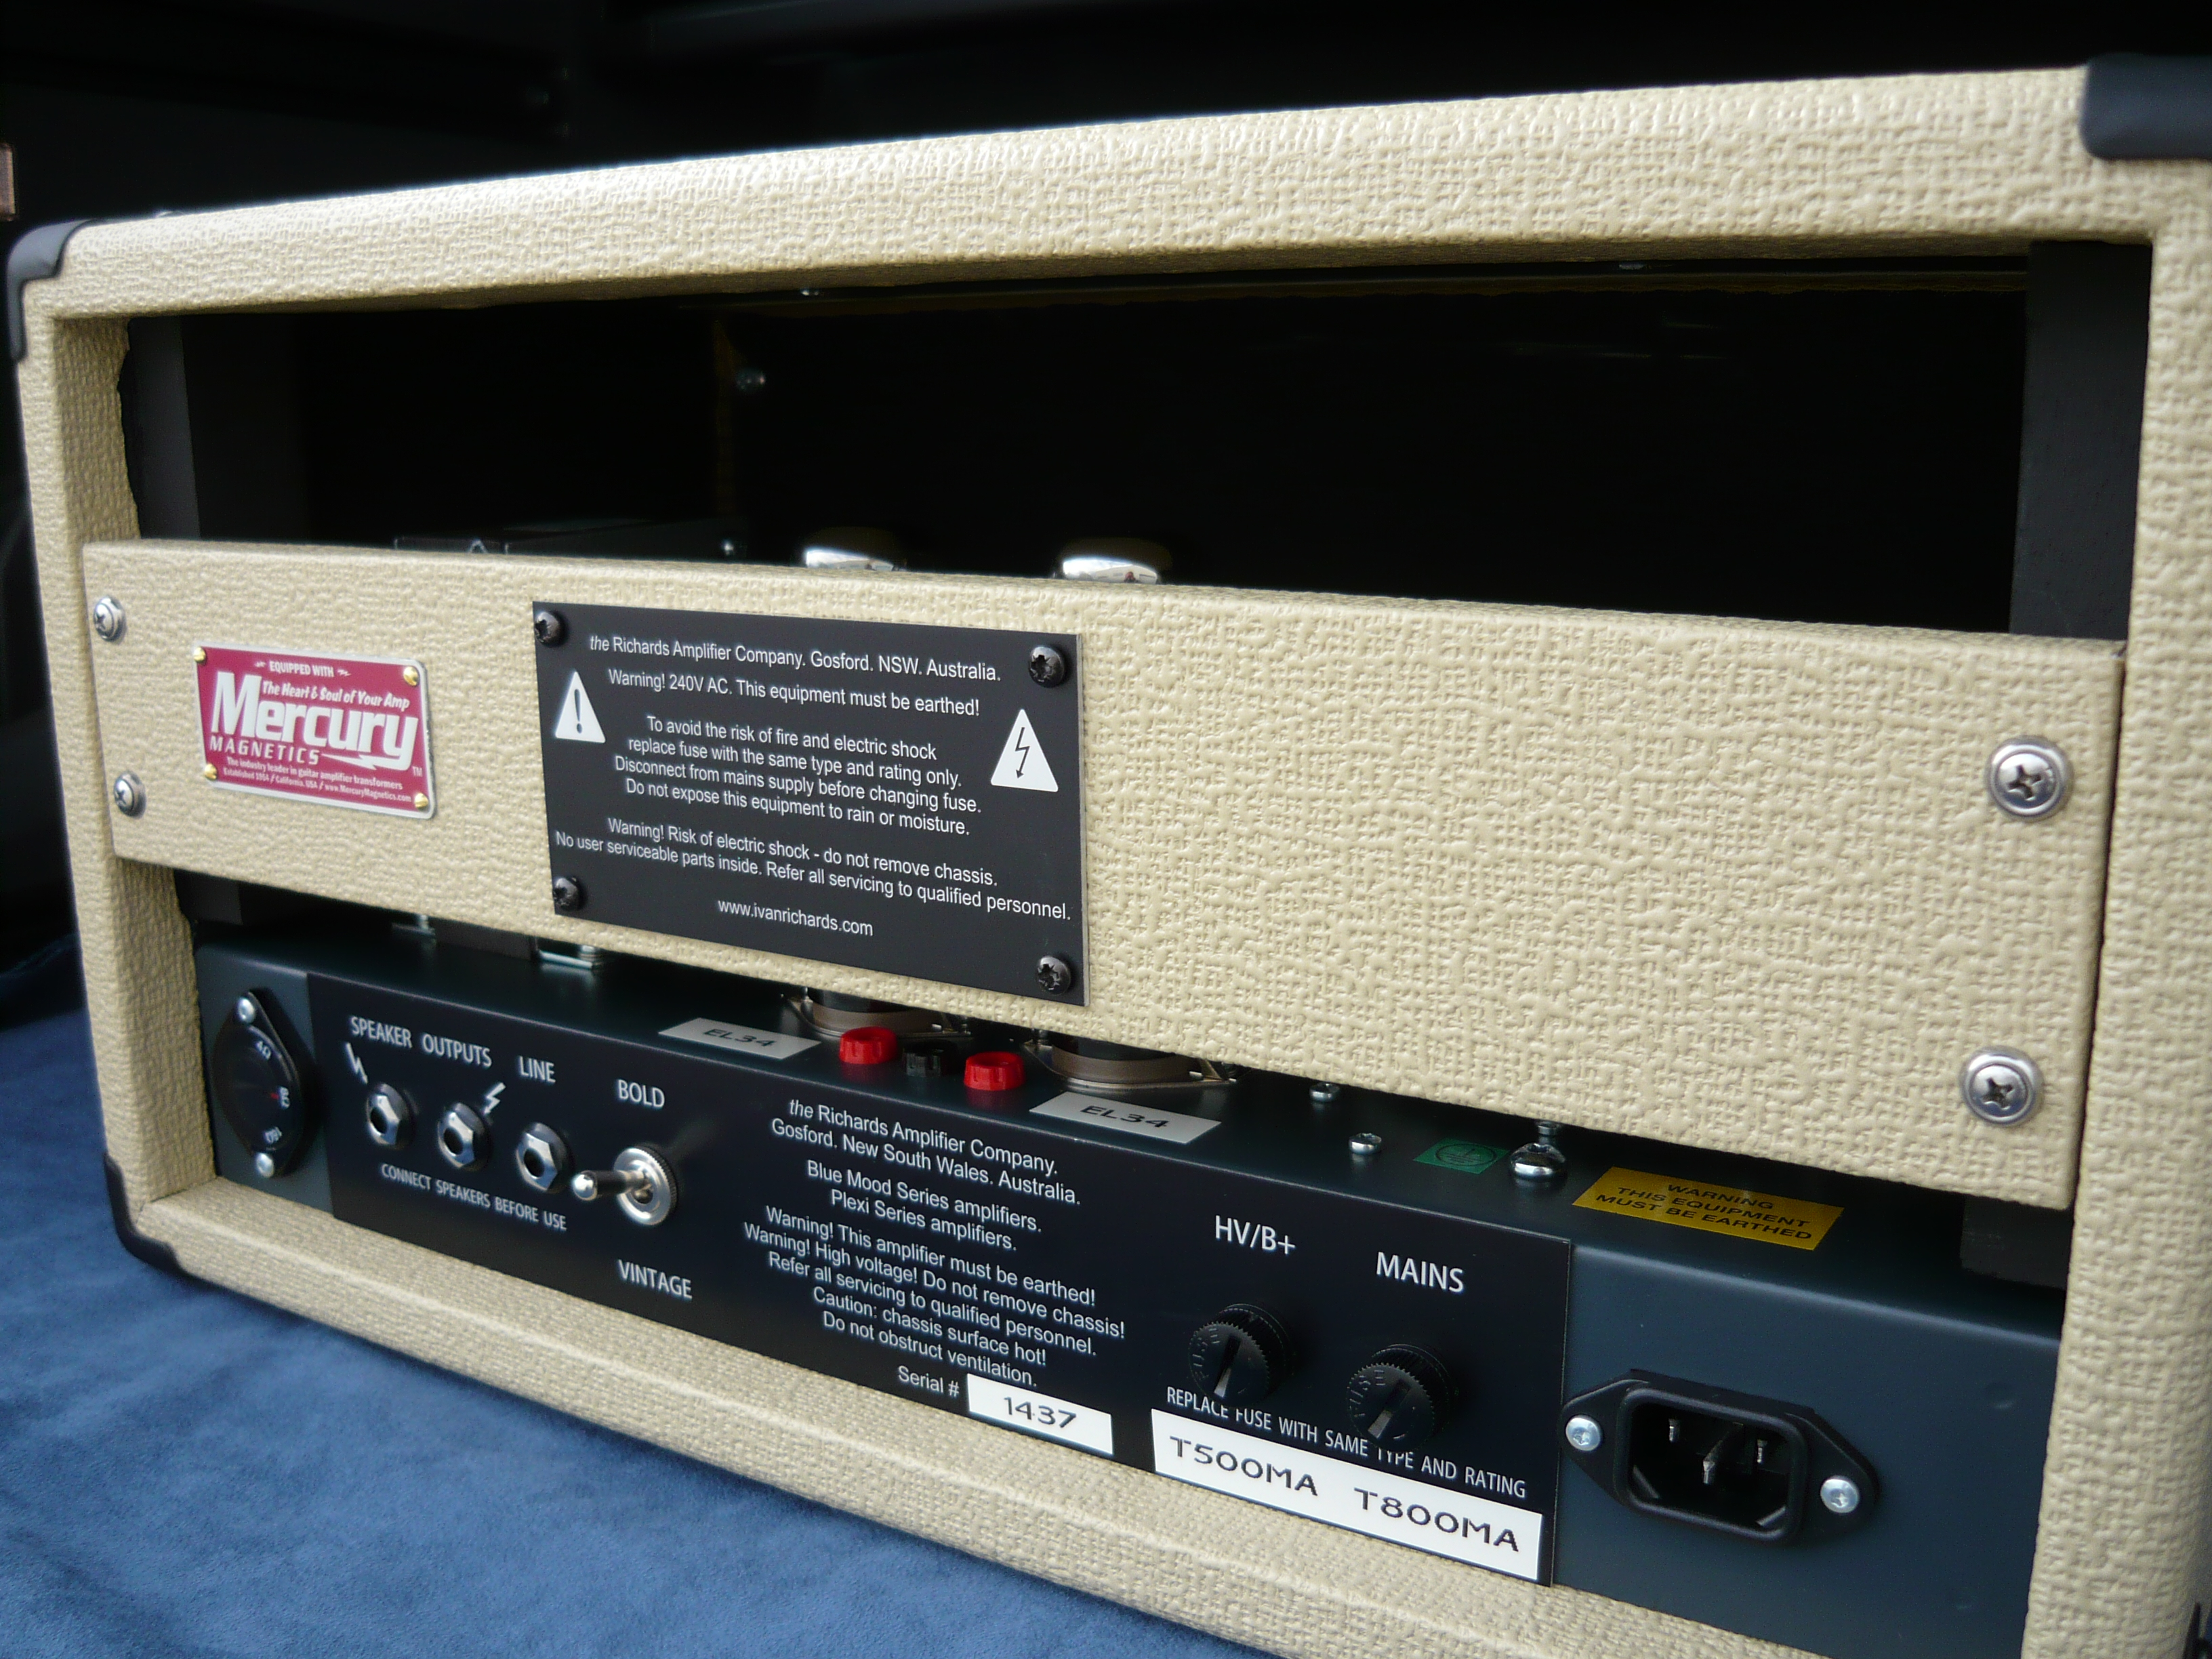
Basically, only one sound was apparently available regardless of which way the slider switches were set. It was as if one pickup had gone open circuit. To access any of the wiring, the switching or the pickups, it is necessary to remove the pickguard, which necessitates loosening off all the strings so that first the bridge can be removed. Both pickups measured 6.1K ohms, so obviously they were not the problem. A Jaguar schematic diagram was sourced from the Seymour Duncan site, actually specific to the original 60’s model. However, just to make things even more confusing, the Japanese reissue does not follow the original colour code – all the wiring is either red or black.

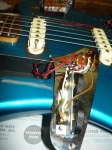
Jaguar looking towards the bridge

Some wiring is easily accessible in the various body cavities, some wiring is routed directly underneath the pickups, which are screwed directly into the body. So, in order to trace which wire goes where, visual inspection is not enough – the wires need to be traced with a multimeter. To start with, we replaced the corroded output jack with a shiny new Switchcraft. The rhythm circuit, located on its own control plate on the upper part of the body, appeared to be where we were losing signal. The single slider switch engages the front pickup only when switched upwards, which has preset volume & tone circuits. When switched downwards, the player can select either front or back pickups, or both,  on the diamond shaped control plate on the lower part of the body, with a 3rd slider switch which attenuates the low frequencies for an even brighter tone. The output from this switch plate is controlled in the more conventional way by volume & tone controls located on the same control plate as the output jack. Phew !

the rhythm circuit control plate – note the thumbwheel rotation of the preset volume & tone controls

We next replaced the rhythm circuit slider switch, but this was not the complete solution to our problems. There did not appear to be any earth return path for the rhythm circuit – perhaps they were relying on the conductive paint which is obvious in all the cavities to complete the circuit, but this was no longer working. To solve the problem once and for all, we ran a wire from the rhythm circuit control plate through to the output jack plate. All functionality was now restored, although all the pots plus the three slider switches on the diamond shaped plate required a good clean. To reassemble, it is necessary to loosen off the strings once more, reinstall the pickguard and the bridge, and reinstall the three control panels. At the end of it all, the tone was what you might expect – very bright & clean (perfect for ‘surf’ instrumentals ?) with limited sustain compared to Strats & Teles, not really applicable to hard rocking styles, and with a much less bright tone from the rhythm circuit. The slider switches don’t feel as positive as the 3-way & 5-way rotary switches employed on Strats & Teles. We rather liked the tone from the neck pickup.

the reassembled Jaguar

Back in the day when the Jazzmaster & Jaguar were conceived, having preset ‘lead’ & ‘rhythm’ circuits made sense, as channel switching amps and pedalboards were still a long, long way into the future. To sum up for Jaguar  newbies such as Hannes & myself, this is how it all works:


Japanese Jaguar resissue

when the 2-way switch on the upper horn is in the UP position, you are playing through the RHYTHM circuit, neck pickup only, with volume & tone being controlled by the two thumbwheel pots on the upper horn

when the 2-way switch on the upper horn is in the DOWN position, you are playing through the LEAD circuit, which is controlled by the regular (ie rotary) volume & tone pots near the output jack, and the three separate 2-way switches located under the neck pickup, which are as follows (in order from closest to the neck) – neck pickup on/off, bridge pickup on/off, & high pass filter (ie bass cut) on/off.

Bob’s Solo Album

March 22, 2016

June 2012 005Yes folks – my very good buddy Robert (aka ‘Bob’) Spencer is recording his very first ever solo album, provisionally titled “SAINTS AND MURDERERS”. A solo album has been a long time coming – after albums with Finch, Skyhooks, The Angels, and The Temple Gods, plus countless sessions over the years either as guitarist or producer, the time is right for Bob to record some of his own stuff. In Bob’s own words……….


Unlike my previous recordings, this album will contain songs which are not required to squeeze into a band’s format, set structure, style, agenda, or which will appease a particular target audience or demographic. In short; I want to record songs which I think are cool and interesting, which groove largely and which I hope you’ll dig, too! 🙂


Please take the time to check out Bob’s campaign for the recording of his album here at pozible……….

www.pozible.com/bobspencer

Here is the link to a “pre-teaser” teaser short video, the result of a collaboration with Laura Davidson……….


We are proud to tell the world that Bob’s choice of amp for the recording of this album, for recording both guitar and bass tracks actually, is the custom-designed-for-Bob KT66 amplifier by the Richards Amplifier Company – Australia. Not the big 4 x KT66 85 watt monster of his, but the very recordable 28 watt custom design. Bob was actually our very first customer who appreciated what the KT66 power output valves could offer (with the right choice of output transformer) in performance and tonality, as compared to other alternatives.

RAW BRIT 2008 001Pedals employed in the recording of this album include our very own Treble Meister, an enhanced Class-A NPN midrange/treble booster pedal, plus an old favourite – the Rich Drive (Bob was the first customer for this overdrive pedal, back in 1997), plus our all-time best seller – the Rich Blues which delivers Bob the extra mids he likes for soloing.


Thanks for checking out our blog again after a long break from writing – but we have heaps more material to publish regarding custom amp builds and interesting amp repairs, so please check us out on a regular basis.

Regards, IR.


Greg’s custom amplifier build progress

March 19, 2015
18W 'British Lead' chassis

18W ‘British Lead’ chassis

Welcome back to the blog after a long break of 3 months. We have been busy !Here is another in our occasional series of blogs where we publish a visual report of a custom-order amp build, in progress. This example shows a Richards Amplifier Company British Lead Series chassis underway for our good customer Greg, of Sydney. Greg has previously purchased our Expressionist and Blue Mood model amps, with matching Tone Cabinets.

18W 'British Lead' chassis

18W ‘British Lead’ chassis

Greg has developed an appetite for vintage ‘British’ tones, but with the output scaled down to a more manageable 18 watts at full power, by employing a pair of 6V6GT output valves (tubes), in lieu of the more obvious choices, such as EL34’s, KT66’s or KT88’s. Rectification of the high voltage supply on this model is handled by a GZ34/5AR4 valve (tube), with excellent current production valves now also available from Tung Sol and Mullard.

18W 'British Lead' chassis

18W ‘British Lead’ chassis

With this project, we are looking to create the broadest range of classic, vintage British tones possible – including those tones recorded by (for example) artists as stylistically diverse as Mark Knopfler (JTM45) or ZZ Top’s Billy Gibbons (JTM45/Plexi/JMP). To that end, we have included a trio of mini toggle switches on the front control panel to reconfigure both the ‘front end’ circuitry and the 3-band passive EQ as required to achieve ‘JTM45’, ‘Plexi’ or ‘Metalface’ voicings. The 2nd mini toggle switch actually switches an additional 12AX7 valve (tube) into the signal path to achieve the more aggressive ‘JMP’ or ‘JCM800’ voicing and gain structure.

18W 'British Lead' chassis

18W ‘British Lead’ chassis

The control panel starts on the right hand side with the traditional 4 inputs, arranged as a pair of inputs for each preamp channel – ‘Brilliant’ and ‘Normal’. The preferred method of operation is to plug into the 1st channel, then use a short, high-quality jack-jack patch lead to cross connect to the 2nd channel. The ‘Brilliant’ and ‘Normal’ channels are now connected in parallel. The player then sets the desired balance between the two tonalities with the preamp volume controls. This is probably best done with the EQ set fairly flat (ie, 12 o’clock), then having balanced the volume controls – fine tune the amp’s voicing using 3-band passive EQ and the ‘active’ presence control.

18W 'British Lead' chassis

18W ‘British Lead’ chassis

A mini toggle switch configures the 3-band passive EQ as per the early ‘blues’ JTM45 voicing, or the later (post 1968) ‘crunch’ voicing. The presence control functions as part of the power amplifier circuitry and adds emphasis to the upper-midrange and high frequencies. A good starting point is to set this control to the 12 o’clock position, then fine tune from there according to the acoustics of your playing environment.

18W 'British Lead' chassis

18W ‘British Lead’ chassis

You could consider the balancing of the two channels as your ‘primary’ equalisation, and the tuning of the 3-band treble/middle/bass controls as your ‘secondary’ equalisation. Then the presence control adds further brilliance as required – in effect the amplifier’s ‘final’ equalisation. We think that a master volume control is absolutely essential on an amp like this, even though it was not provided on the original amps that inspired us all.

18W 'British Lead' chassis

18W ‘British Lead’ chassis

Once you have found your ‘sweet spot’, mixing the preamp volumes and refining the EQ and voicing options available on this amp (as discussed in the paragraphs above), there is a reasonable chance that you will be playing at a volume that is considered excessive under the prevailing circumstances, hence the inclusion of our master volume to keep it all under control. The guitarist who prefers to play with the amp running wide open will appreciate the transparency of our master volume design when set to maximum clockwise rotation.

The master volume (MV) control actually functions as part of the power amplifer circuitry – ie, it is located post phase-inverter stage (PPI) in the signal path. The primary function is to manage the output levels as required, but when used specifically to generate distortion, its location means that every preamp valve (tube), including the 12AX7/ECC83 phase-inverter stage, is contributing to the end result. There are other benefits to this design approach as well. With the MV set to maximum clockwise, the amp (up to the point of power amp clipping) is delivering its cleanest, brightest and tightest tones. On the other hand, as the MV is rotated anti-clockwise, the effect of the global negative feedback loop is progressively minimised, and the amp loosens up and behaves much more like a vintage amp design, with a sound full of fat, warm ‘valvey’ character.

The remaining front panel controls include high-quality metal toggle switches for power on/off and standby/play functions, plus a power-on indicator. The rear panel controls/functions include mains and high voltage supply fuses, full-power/half-power switch (once again a high-quality metal toggle switch), output jacks for 16, 8 and 4 ohms, plus an earth-lifted output jack for line/recording, ie DI.

We will now be offering this amplifier model as a permanent fixture in our range of designs, with power output options of 18 watts (6V6’s), 30 watts (KT66’s), 40 watt club amp (EL34’s), 50 or 100 watts (EL34’s), 60 watts (KT88’s).

Thank you Greg, for your continued custom and enthusiasm for our amplifiers !  IR.

a testimonial to the Richards KT88se amplifier

October 28, 2014
the mighty KT88

the mighty KT88

Here is a testimonial to the KT88se model amplifier, rated at 15 watts into 4, 8 or 16 ohms, designed and hand-wired, one at a time, by the Richards Amplifier Company – Australia.

The testimonial was written by Chris Earle, Sydney based baritone guitar and open-tuning guitar stylist and is reproduced in it’s entirety without any editing. Chris commisioned the development of this unique design and ordered the first two amps to be completed.

Please see our previous blog for an introduction to the KT88se and a detailed background to the development of this model. Many thanks to our good customer Chris for these words……….

“This amplifier is unique and highly innovative – during my research I’ve not come across a dedicated KT88 single ended amplifier built to such a high specification – there may be some ‘home brew’ ones out there – but none with the same impeccable build quality, application of years of hard won intellectual property, and unquestionable tone.

The oversize Mercury Magnetics transformers and choke certainly play their part – but it’s Ivan’s skill and insight with amplifier design that makes this the best amplifier I’ve heard or played by a country mile.

It has a truly rich beautiful sound – the notes decay with a chunky well defined solidity that I’ve never heard before – the 2nd harmonic is sublime with this amp – it provides an extra depth that is unforgettable.

The use of a Richards modified Hiwatt style preamp is a master stroke by Ivan. It allows the clean signal to be uncluttered by any form of fizz or fuzz and translate every subtlety and nuance from the fretboard.

This means it sounds amazing with modulation, be it Uni-Vibe, Chorus, Phaser or Flanger as well as long, full delay trails. But the piece de resistance is the driven sound – a richer, fuller sound is not humanly possible !

Yet it still retains astonishing clarity with my oversize guitars, be it open-tuned chords, slide or blazing single note runs and vibrato – no mean feat given the shortcomings of a single ended design that I’d experienced previously: lack of headroom and a compressed, cluttered sound.

Once the sound was dialed in – EQ flat, no adjustments necessary (though there was extensive experimentation), I was shocked to discover I had the guitar tone I’d craved all my life – you encounter that only once and I’m glad I did and get to play it !”


Thanks Ivan.


Chris Earle,

Sydney, Australia. October 2014.

Introducing the KT88se amplifier

October 22, 2014
the new KT88se amplifer by the Richards Amplifier Company - Australia

the new KT88se amplifer by the Richards Amplifier Company – Australia

Ladies and gentlemen ! Let us proudly introduce you to our very first amplifier designed from the ground up to showcase the mighty KT88 power output valve. There are another two models in the early stages of design and construction, but the prototype KT88se is the first and has been in constant use by owner Christopher Earle since he took delivery Christmas 2013/2014. Chris is a baritone guitar and open-tuning guitar stylist from Sydney, Australia. He has been using the KT88se for creating, previewing  and recording his repertoire.

the KT88se (with FX Loop)

the KT88se (with FX Loop)

The KT88 valve, in the ideal circuit, is capable of creating the most awesomely robust guitar tones you can imagine. They were employed back in the day in a number of Australian and New Zealand built amplifiers, Wasp being the best known example – also in a number of higher powered British amps, famously including the Marshall Major. In the days of rack-mounted power amps and preamps, there was also a very fine sounding KT88 dual 100W power amp from Seymour Duncan. However, during the 80’s and 90’s things looked very bleak for the KT88 – it became impossible to source KT88’s of sufficiently high quality construction to hold up ‘on the road’ (as well as the fact that the original UK manufactured examples became impossibly expensive). All those Wasp amps, and Marshall Majors,  were ‘retired’ from active duty.

KT88se chassis - rear view

KT88se chassis – rear view

Thankfully, that situation has completely turned around in the last decade or so with a number of factories producing very good sounding KT88’s – Genalex/Gold Lion and Electro Harmonix are two brands we can recommend from personal experience in guitar amps. We have yet to try the new Mullard (reissue) KT88’s. In this first amp chassis we have employed a pair of Gold Lion 12AX7’s in the preamp, as well as the single KT88 output valve. The combination is stunning.

KT88se chassis - front view

KT88se chassis – front view

Well, moving on folks: the ‘se’ in KT88se obviously stands for ‘single-ended’. Rather than a ‘push-pull’ power amplifier configuration (the most common arrangement in valve guitar amps), utilising a pair or multiple pairs of output valves for greatest efficiency, in this configuration we utilise a single power valve, driving a very substantial output transformer specifically designed for this application, and biased to operate in pure ‘Class-A’ mode. By employing the KT88 valve, we can achieve an audio output of 15 watts with suitable transformers – ample power to achieve good results with our favourite vintage style guitar speakers. By comparison, most single-ended guitar amp models, whether commercial or boutique, actually only deliver about 4 watts maximum employing a single EL84 or 6V6, with limited bandwidth, regardless of any marketing claims.

the Genalex KT88 (new production)

the Genalex KT88 (new production)

The ‘single-ended’ output stage results in a unique tone, compared to the ‘push-pull’ output stage. Whether one is ‘better’ than the other is purely a question of personal taste, of course. For the guitarist, the ‘single-ended’ amp does not cancel out even order harmonics, so the resulting sound is very rich in the 2nd, 4th and so on harmonics, which are more pleasing to the ear than odd order harmonics, and are heard as a warmer, fatter and more complex tone. The asymmetrical clipping on overloads further emphasises even order harmonics. Power supply hum is rejected with additional filtering, and the inclusion of a filter choke capable of carrying the full high voltage current draw of the amplifier, “upstream” from the output transformer.

(optional) buffered FX Loop with KT88se sitting on Hame 1x12 cab

(optional) buffered FX Loop with KT88se sitting on Hame 1×12 cab

The KT88se has full guitar preamp functionality with a single high impedance input jack, preamp volume control,  three 12AX7 gain stages, three band ‘British’ passive EQ, a buffered FX Loop driven by the spare 1/2 12AX7 stage, metal power and standby switches with power ON indicator. We are also offering the same amp without the FX Loop for those who require the purest possible signal path. Completing the front panel functionality is the unique Drive control, which operates in the power amp circuitry and adjusts the global amp gain or sensitivity by increasing or reducing/bypassing the effectiveness of the global negative feedback loop.

The rear panel also offers full functionality with mains and HV (high voltage) supply fuses, power output jacks for 4, 8 and 16 ohm speaker systems, and a line-level signal output jack. The Bold/Vintage switch reduces power output from 15 watts to 6 watts in ‘Vintage’ mode. Our amp launch held at the Rock God Music School (Wyoming NSW) revealed the completed amp design exceeded all expectations and delivered a monstrous tone. In our next blog, we will publish Chris Earle’s testimonial/review of the KT88se.

Ivan Richards.

Jonothan takes delivery of his ‘Expressionist’ 15W amplifier

September 30, 2014
Expressionist 15W head in vintage red tolex with checkerboard grille

Expressionist 15W head in vintage red tolex with checkerboard grille

Welcome Back. This blog showcases once again the Expressionist Series amplifier, designed and built by the Richards Amplifier Company – Australia. This latest example is a custom order for Sydney-based guitarist Jonothan Holmes, in stunning vintage red tolex covering, with a contrasting ‘checkerboard’ front grille cloth. We previously presented the Expressionist amp in blogs dated 01May2012, 24July2011 & 10July2011, including photographs and a testimonial written by Aria Award winning producer, Jonathan Burnside.

the Expressionist 15W model

the Expressionist 15W model

We have been building the Expressionist models for well over 10 years now, with 15 watts currently the most popular power rating. The Studio Expressionist option, as pictured in this blog, enables the user to select either the standard (for this model) EL84/6BQ5 output valves or the alternative 6V6GT output valves, offering the broadest possible range of tones for your recording projects.


rear view Expressionist 15W

rear view Expressionist 15W

The EL84 output valves, which are employed throughout the Expressionist Series amps, are famous for their chimey tops, complex midrange and lively dynamic response. By contrast, the 6V6 output valves are noted for sounding smooth and sweet, ie they were the valves typically used in the smaller Gibson and Fender amps back in the day. This is actually the first time we have employed the new Mullard (reissue) 6V6GT valves, as well as the new Tung Sol (reissue) GZ34/5AR4 rectifier valve. EL84/6BQ5 valves by JJ, Electro-Harmonix and Tung Sol (reissue) have all proved themselves to be reliable performers in cathode-bias/Class-A amplifiers in the 15 to 30 watts range.

Expressionist 15W chassis - top/front view

Expressionist 15W chassis  top/front view

The intention of the Expressionist Series model is to offer the classic vintage Brit tones from 1959 to 1965, and well beyond. The preamp offers two discrete channels, ie each channel has it’s own unique signal path and equalisation. There is no shared circuitry until the two preamp signals are combined in the phase inverter stage of the power amplifier. The two channels are mixed together in such a way that they are back in phase with each other, conveniently enabling the channels to be patched together in the traditional way, or combined with an A/B/Y pedal (supplied with each Expressionist).

Expressionist 15W chassis top/rear view

Expressionist 15W chassis
top/rear view

Channel 1 is built around the EF86 pentode preamp valve, recently reissued by Tung Sol, but also still available on the n.o.s. market. This channel is voiced with a (relatively) flat midrange response, as opposed to the more usual ‘scooped’ midrange response of iconic valve guitar amp designs since the 1960’s. The deceptively simple 6-way Colour tone switch enables the perfect midrange to low frequency balance for your performance. Here’s our tip: patch CH-1 and CH-2 together for a blend of ‘scooped’ and ‘non-scooped’ EQ – it’s a huge and powerful tone. Always use a short, high-quality jack/jack patch lead for this purpose.

Expressionist 15W chassis

Expressionist 15W chassis

Channel 2 employs a pair of 12AX7/ECC83 twin triode valves to provide two sequential gain stages and a cathode-follower ‘tone stack’ driver stage. Obviously this channel was inspired by the famous  ‘top boost’ channel in the mid 1960’s British Invasion amps. We have spent the last decade tweaking this channel to achieve a tonality that equals the very best examples of the vintage era (quite unlike the various ‘reissues’ from the last couple of decades, including both UK and Chinese manufacture).

EF86 with added dampening

EF86 with added dampening

Finally, the power amplifier section has recently been upgraded with an over-spec’d power transformer that runs cool at full power. We have also upgraded the filter choke, which is an over-spec’d clone of an original mid-60’s Brit choke. This component is an important contributing factor to the ‘feel’ of playing through this amp, while filtering the rectified high voltage (HV) DC to a more significant degree. This means there is less power supply hash in your signal, ie less non-musically related harmonics. Our intention always is to build amps that just sound so damn good that you don’t want to put down that guitar !!

The power amp section is where we have situated the master ‘tone cut’, which is like a passive presence control, and a key ingredient in the tone of these amps, plus the master volume. The design of the master volume enables the preamp to be overdriven at conversation levels, but at full clockwise rotation has no effect on your tone. However, for that chimey clean Brit-pop tonality we recommend setting the master volume to max, and running the amp ‘wide open’. Set the ‘tone cut’ control to personal taste – it is very useful for controlling the spikey high end of some single coil pickups.

All our amps, regardless of which model, are designed from the outset to work well with your pedals. The pedals are intended to be patched between guitar and amp. We obviously cannot comment on every one of the thousands of overdrives/fuzzes/etc out there on the world market, but most of our customers are using various combinations of pedals/pedalboards very successfully with our amps. Each and every one of our amps is individually hand-built, one at a time, by one person, from beginning to end. It takes a lot longer this way, but it’s worth it !

Ivan Richards.

the Landry 100 watt amplifier in our workshop

August 3, 2014
the Landry amplifier

the Landry amplifier

Hello again. We are now offering world-class (non-warranty) service and repairs to Landry amplifiers of St. Louis, Missouri USA. We should point out that we have no official relationship with Landry amplifiers, so we cannot accept any warranty repair claims without the endorsement of Landry or their Australian sales representative. The Landry amp is a relative newcomer to the boutique guitar amp scene. We endorse the fact that these amps are totally valve (tube) circuitry (apart from solid-state rectifier), and are completely hand-wired and assembled, presumably by one person.

the Landry amplifier

the Landry amplifier

Landry are producing only one or two models, very obviously voicing their amps towards the classic British/Marshall sounds (in both channels), but with a number of enhancements and more modern high gain sounds available as well. There are two independent preamp channels, each with its own 3-band passive EQ. The ‘clean’ channel is voiced similar to a JTM45/Bassman style amp, and the ‘distortion’ channel is voiced similar to a JMP series amp, but with additional gain available via a footswitch. After the channel switching takes place the signal is routed via a valve-driven series FX Loop.

the Landry amplifier

the Landry amplifier

The master volume is of completely conventional design, following after the FX Loop, but works very effectively in this amp design. The big surprise in a Marshall inspired amp such as this, is the inclusion of a valve (tube) driven reverb of very acceptable sound quality. Certainly much better than the reverbs ever were in Marshall amps over the years ! The phase inverter, power amp and power supply stages are very similar to what you would find in a 100 watt JMP Marshall.

Landry turret board and hand wiring

Landry turret board and hand wiring

The power and audio output transformers are in fact the very excellent 100 watt JMP style models by Classic Tone/Magnetic Components of Chicago USA. The claim on the Landry website that the ‘clean’ channel delivers sparkling blackface tones is of course an exaggeration. This channel delivers the fatter JTM45/plexi/’59 Bassman type tones, and there is absolutely nothing wrong with that at all.

setting the bias on this amp is very easy

setting the bias on this amp is very easy

Our good customer, Steve Edmonds brought this 100 watt head into the workshop last week, stating that the amp had lost some of its magic. Please see our post of 25/2/2014 re the Steve Edmonds band, and new project Mescalero. Inspection of the chassis revealed no apparent problems, but testing all the valves (tubes) separately from the amp did reveal most of them were in a degraded state, suffering from microphony, low gain, etc. Apart from a Tung Sol (reissue) 12AX7 in position V1, all other valves (tubes) were Chinese 12AX7B and EL34B. Now this amp is really only a few months old, but Steve is currently the hardest working guitarist we know, generally playing four gigs per week.

Landry chassis: six preamp valves in total

Landry chassis: six preamp valves in total

As a sweeping generalisation, Chinese manufactured valves (tubes) can quite often sound very good indeed when brand new, but can also lose their quality relatively quickly. Their 12AX7’s especially seem to become not only microphonic but also rather harsh and brittle. No doubt they will improve their quality of manufacture over time, the Russians certainly have. We installed a mixture of JJ, Electro-Harmonix and Tung Sol (reissue) valves, pre-tested and graded in our workshop, making an effort to select the ideal valve for each position. For the output stage we installed a matched quartet of Tung Sol EL34B, which have been certainly the most reliable of current production EL34’s (in our experience), although they do sound different to other EL34’s – therefore the customer’s personal tastes have to be taken into account in these situations.

the Landry chassis

the Landry chassis

Rebiasing the Landry for new output valves is easy and convenient – I wish the major manufacturers would take note ! All four EL34 cathodes are connected together to ground via a 1 ohm/10 watt resistor, which in turn is connected to external DVM test points. Simple ! The amp passed its power output and burn-in testing with flying colours, and it seems that Steve is very happy with what he was hearing at last week’s rehearsal. Many thanks to Steve Edmonds for his continued support and for supplying us with the subject matter for this blog. IR.

emergency repairs for the Steve Edmonds Band

February 25, 2014
Steve Edmonds (official) promo photo

Steve Edmonds (official) promo

Steve Edmonds is a well established and much admired guitar player on the Australian music scene, based in the Sydney area. Steve has put a lot of hard work into carving out his own niche as a blues guitarist, a straight ahead rock guitarist, ie the Steve Edmonds Band, and is also well known for his Jimi Hendrix Tribute shows, eg Hendrix and Heroes.

'57 Tweed Twin replica blowing fuses

’57 Tweed Twin replica blowing fuses


More recently, Steve has come up with a fresh concept and a new band by the name of Mescalero. With Esteban (Steve) on guitar/vocals, Antonio on drums and Alejandro on double-bass, Mescalero are described as a Roots Rock band, which incorporates Rockabilly, Surf, Western Swing, Bop, Big Band, Ska, Mambo and Country influences ! The new band is already gigging and recording.

'57 Tweed Twin replica (with a couple of vintage amps in the background)

’57 Tweed Twin replica (with a couple of vintage amps in the background)

Which brings us to the subject matter of this blog – both Steve and Alex had amp mishaps last week which required immediate attention as there were gigs booked from Thursday night onwards. Firstly, there was Steve’s amp. This is a replica of the ’57 Tweed Twin Amp, made in China, and distributed locally by Lawrie Minson in Tamworth, New South Wales. These are the models that famously (in the Fender line-up) introduced separate Treble and Bass controls, rather than a single Tone control (the addition of a Midrange control was still a year or two away), along with the Bandmaster, Super and Pro amp models (apologies to Fender enthusiasts if we’ve left out any details).

the culprit !

the culprit !

Steve’s amp was repeatedly blowing the mains fuse – if this happens more than once clearly something is seriously wrong ! At first we all assumed that one or both of the 5U4 rectifier valves had developed a short-circuit (S/C). This is quite a reasonable assumption, but it was not to be that simple.


'57 Tweed Twin replica amp chassis

’57 Tweed Twin replica amp chassis

We first plugged the amp into the mains via a ballast light, so that we didn’t have to keep replacing blown fuses while troubleshooting the problem. We removed all valves (tubes) from their sockets but the S/C was still there. Obviously the problem was in the power supply, and potentially the power transformer was the culprit. One by one we removed the transformer secondaries, so that each secondary was unloaded, and retested.

Please don’t try this at home !!

under the chassis of the '57 Tweed Twin (China)

under the chassis of the ’57 Tweed Twin (China)

Finally, we had the primary connected directly the the active and neutral wires and we still apparently had a S/C in the power transformer. So, we emailed Lawrie Minson who sent us down a replacement transformer which we installed, along with a bit of tidying up of the 240V primary wiring. With all valves reinstalled and tidying up of the disturbed wiring with nylon cable ties, we could successfully test Steve’s amp for electrical safety and power output. Back in the day, even with a pair of 5U4 rectifiers, these amps only delivered around 30 watts rms, and this replica of course delivers similar performance.

Installing a pair of Celestion 'Greenbacks' into Steve's amp

Installing a pair of Celestion ‘Greenbacks’ into Steve’s amp

Steve actually requested slightly earlier break-up, so we installed a single 5U4 by Electro-Harmonix, our favourite sounding current production 5U4, which also has a good reputation for reliability. The factory loaded speakers with this amp were a pair of the budget model Celestion G12-65 (not the ‘Heritage’ model), which were letting the amp down quite noticeably. At Steve’s request we upgraded these to a pair of Celestion G12M25 ‘Greenbackspeakers, at 8 ohms each, wired for the system impedance of 4 ohms.

still one of the sweetest sounding guitar speakers !

still one of the sweetest sounding guitar speakers !

This upgrade improved the tone and response of the amp 100 %. The woody, somewhat midrange-scooped tone of the Greenbacks balanced better with the flat midrange response (at most settings) of the ’57 Tweed Twin amp, and introduced a warmth and sweetness that wasn’t really there before. When Steve came to pick up the completed repair/upgrade he gave the amp a good workout with our Fender ’52 Tele Reissue loaded with the Pete Biltoft Vintage Vibe pickups (see blog NOV 24, 2013).

Steve's amp reassembled !

Steve’s amp reassembled !

Part-II of the story: Mescalero bass player Alex Campbell brought his amp to the workshop – a Hartke 500 watt bass amp head. A mishap when moving the bass rig caused a jack plug to break off inside a speaker jack on the back of the amp, and worse still the master volume control was smashed and unuseable. Aside from those two issues the amp appeared to be unharmed.

Alex's Hartke 500W bass amp head

Alex’s Hartke 500W bass amp head

We removed the broken speaker plug from inside the amp, wired Alex a new heavy-duty jack-jack speaker cable, and stripped out the preamp/power supply PCB to replace the 10K Lin 16mm master volume pot. This involves unscrewing many, many screws and removing the front panel – the complete job takes about an hour. While we had the amp apart we cleaned up accumulated dust from the power amp’s forced air cooling system – an important little task to keep the amp running reliably.

inside the Hartke bass amp

inside the Hartke bass amp

The design and assembly of the Hartke amp is completely conventional – there is no digital circuitry, no switching power supply. The amp is isolated from the 240V mains by a huge toroidal transformer. From the point of view of the service tech, this is a positive thing – the whole amp is accessible for ease of servicing. The only problems we’ve had with the Hartke amps over the years (with one or two exceptions) have been ‘dry’ solder joints and poor quality input jacks. The Hartke does not have a ‘signature’ sound, but this is a matter of personal taste.

Many thanks to Steve and Alex for their continued custom ! We wish Steve all the best for his new band – please check out Mescalero soon.

http://www.mescalero.com.au

http://www.hendrixandheroes.com

http://steveedmondsband.com

Ivan’s new Hame 1×12 cab

December 13, 2013
Hame 1x12 cab

Hame 1×12 cab

Hello & welcome back to our blog. Occasionally our customer amplifier projects require the input & support of a specialised cabinet builder, for work that is beyond our amp building workshop’s resources. For example, we have utilised the unique cabinet building skills of Mr Peter Davies (ex NSW Central Coast, now resident in Melbourne) several times for our exotic hardwood cabs.

Hame 1x12 cab

Hame 1×12 cab

More recently we have enlisted the help of Mr Brandt Horrocks of Hame Speaker Cabinets (Wagga Wagga NSW) to produce a pair of specialised 2×12 cabs for baritone guitar stylist, Mr Chris Earle. As a spin off from that project, Chris also ordered a pair of somewhat more compact 1×12 cabs, one each for Chris & Ivan, for rehearsals & lounge gigs. We will look at the 2×12 cabs in greater detail in a later blog, as part of the broader Chris Earle project.

Hame 1x12 cab

Hame 1×12 cab

This 1×12 cab design is a much simplified version of the original 2×12 cab design, which included angled speaker baffles. In both cases, the cab design allows sound to pass through vents on either side of the cab. These vents are not tuned, as in a “bass-reflex” system (ie, the cab is “de-tuned”). Sound emanates from the sides of the cab much as it would from the rear of an open back cab, while providing better dispersion & more consistent tone from venue to venue. In the 2×12 cab design internal angled reflectors push the sound from the rear of the speakers to the side vents.

Hame logo

Hame logo

The end result is a speaker cab that is never “boxy” or “boomy”, with outstanding dispersion, clarity & a solid low-end. The intended companion amp for Chris Earle’s 1×12 cab is a brand new model from the Richards Amplifier Company – Australia: the KT88se, ie a single-ended/class-A KT88 amplifier. This amp will be part of the “British Lead” series, meaning that the front end is voiced as per some of the classic amps from the golden-age of British rock. This amp is the result of months of R&D during 2013, & will be the subject of a future blog.

the pair of 1x12 Hame cabs under construction

the pair of 1×12 Hame cabs under construction

Please take the time to check out these photos of the new cabs. Regards – IR.

under construction

under construction

completed

completed

completed

completed

completed

completed

2x12 cabs completed

2×12 cabs completed

Brett takes delivery of his custom Blue Mood 30W EL34 head

December 1, 2013
Blue Mood EL34 head in rough blonde tolex

Blue Mood EL34 head in rough blonde tolex

This blog showcases a customised “Blue Mood” series amplifier designed & built by the Richards Amplifier Company – Australia, for our good customer Brett Lowe. Brett has been playing guitar & bass on the local Central Coast (N.S.W.) scene for many years and was a pupil of the late, great Don Andrews, so he knows his stuff. When Brett was looking for specific voicing for his next amplifier acquisition, he came to us and we recommended a custom design based on our successful Blue Mood series amps.

Blue Mood 30W EL34 head

Blue Mood 30W EL34 head

Brett was looking for a hybrid Brit/USA voicing, so we kept the layout and gain structure of the Blue Mood amps, but substituted a pair of EL34 output valves (tubes) in lieu of the 6V6 & 6L6 family of output valves we would normally employ in this series of amps.

Blue Mood EL34 amp head

Blue Mood EL34 amp head

We rejigged the choice of output transformer and its primary impedance & also revoiced the 3-band passive EQ for a more Brit tonality, all of which contributed to the final result. The amp retains the Blue Mood features of a bypassable master-volume, and a pull-shift on the bass control for fine tuning of the bottom end, plus a “bold/vintage” switch on the rear panel to reconfigure the EL34’s to cathode-bias operation for a nominal half-power output.

Blue Mood 30W EL34 head

Blue Mood 30W EL34 head

Brett chose “rough blonde” tolex & “wheat” grille cloth to match one of his speaker cabs. Brett has acquired (and sometimes moved on) many amps over the years, including DR-Z, Swart, Bad Cat, Budda & so on, ie many of the top boutique names in the business – but his band mates are of the opinion that this is the best sounding amp he’s ever owned. We love to hear that !

rear panel - Blue Mood

rear panel – Blue Mood

You can see in the photo opposite, we have employed an output transformer by Mercury Magnetics – we are one of their recommended installers, by the way. The choice of output transformer was a key ingredient in the design of this amp. Our next project for Brett will be a replica of the “Brownface” 2×10 Vibroverb amp of 1963, once again employing transformers & choke by Mercury. We will report on this success of this project in a few weeks. Regards – Ivan.

rear view - Blue Mood

rear panel – Blue Mood

rear panel - Blue Mood

rear panel – Blue Mood

burn-in test @ the Rock God Music School Wyoming

burn-in test @ the Rock God Music School Wyoming

burn-in test @ the Rock God music school Wyoming

burn-in test @ the Rock God Music School Wyoming