Archive for the ‘Uncategorized’ Category

Fender Jaguar (reissue) with wiring issues

July 2, 2017

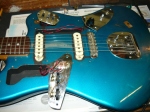
a Jaguar on the bench

Hello again. As a bit of a departure from talking about amps & pedals, this week we talk about service & repairs to solid body electric guitars. To be more specific, a Fender Jaguar made-in-Japan reissue (serial # N070078), which was recently delivered to the workshop by regular customer Hannes Leak. We have been repairing, rewiring, upgrading pickups and so on, to solid body electric guitars for many years – however, this is the very first time we have struck a Fender Jaguar (or even played one), so they have been a bit of a mystery until now.


accessing the Jaguar controls

Hannes had recently acquired this instrument on the 2nd hand market, however it appeared that the switching & controls were not functioning. To a Jaguar novice, the arrangement of controls is somewhat confusing – there are four slider switches and two sets of volume & tone controls – none of this is actually labelled so you have to read up on Jaguars to understand the intended functionality.


the Jaguar pickup selector switches (plus mysterious tone switch)

Basically, only one sound was apparently available regardless of which way the slider switches were set. It was as if one pickup had gone open circuit. To access any of the wiring, the switching or the pickups, it is necessary to remove the pickguard, which necessitates loosening off all the strings so that first the bridge can be removed. Both pickups measured 6.1K ohms, so obviously they were not the problem. A Jaguar schematic diagram was sourced from the Seymour Duncan site, actually specific to the original 60’s model. However, just to make things even more confusing, the Japanese reissue does not follow the original colour code – all the wiring is either red or black.

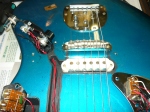
Jaguar looking towards the bridge

Some wiring is easily accessible in the various body cavities, some wiring is routed directly underneath the pickups, which are screwed directly into the body. So, in order to trace which wire goes where, visual inspection is not enough – the wires need to be traced with a multimeter. To start with, we replaced the corroded output jack with a shiny new Switchcraft. The rhythm circuit, located on its own control plate on the upper part of the body, appeared to be where we were losing signal. The single slider switch engages the front pickup only when switched upwards, which has preset volume & tone circuits. When switched downwards, the player can select either front or back pickups, or both,  on the diamond shaped control plate on the lower part of the body, with a 3rd slider switch which attenuates the low frequencies for an even brighter tone. The output from this switch plate is controlled in the more conventional way by volume & tone controls located on the same control plate as the output jack. Phew !
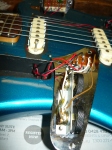
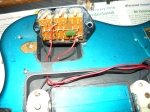
the rhythm circuit control plate – note the thumbwheel rotation of the preset volume & tone controls

We next replaced the rhythm circuit slider switch, but this was not the complete solution to our problems. There did not appear to be any earth return path for the rhythm circuit – perhaps they were relying on the conductive paint which is obvious in all the cavities to complete the circuit, but this was no longer working. To solve the problem once and for all, we ran a wire from the rhythm circuit control plate through to the output jack plate. All functionality was now restored, although all the pots plus the three slider switches on the diamond shaped plate required a good clean. To reassemble, it is necessary to loosen off the strings once more, reinstall the pickguard and the bridge, and reinstall the three control panels. At the end of it all, the tone was what you might expect – very bright & clean (perfect for ‘surf’ instrumentals ?) with limited sustain compared to Strats & Teles, not really applicable to hard rocking styles, and with a much less bright tone from the rhythm circuit. The slider switches don’t feel as positive as the 3-way & 5-way rotary switches employed on Strats & Teles. We rather liked the tone from the neck pickup.

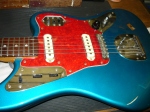
the reassembled Jaguar

Back in the day when the Jazzmaster & Jaguar were conceived, having preset ‘lead’ & ‘rhythm’ circuits made sense, as channel switching amps and pedalboards were still a long, long way into the future. To sum up for Jaguar  newbies such as Hannes & myself, this is how it all works:


Japanese Jaguar resissue

when the 2-way switch on the upper horn is in the UP position, you are playing through the RHYTHM circuit, neck pickup only, with volume & tone being controlled by the two thumbwheel pots on the upper horn

when the 2-way switch on the upper horn is in the DOWN position, you are playing through the LEAD circuit, which is controlled by the regular (ie rotary) volume & tone pots near the output jack, and the three separate 2-way switches located under the neck pickup, which are as follows (in order from closest to the neck) – neck pickup on/off, bridge pickup on/off, & high pass filter (ie bass cut) on/off.
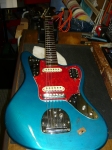
Bob’s Solo Album

March 22, 2016

June 2012 005Yes folks – my very good buddy Robert (aka ‘Bob’) Spencer is recording his very first ever solo album, provisionally titled “SAINTS AND MURDERERS”. A solo album has been a long time coming – after albums with Finch, Skyhooks, The Angels, and The Temple Gods, plus countless sessions over the years either as guitarist or producer, the time is right for Bob to record some of his own stuff. In Bob’s own words……….


Unlike my previous recordings, this album will contain songs which are not required to squeeze into a band’s format, set structure, style, agenda, or which will appease a particular target audience or demographic. In short; I want to record songs which I think are cool and interesting, which groove largely and which I hope you’ll dig, too! 🙂


Please take the time to check out Bob’s campaign for the recording of his album here at pozible……….

www.pozible.com/bobspencer

Here is the link to a “pre-teaser” teaser short video, the result of a collaboration with Laura Davidson……….


We are proud to tell the world that Bob’s choice of amp for the recording of this album, for recording both guitar and bass tracks actually, is the custom-designed-for-Bob KT66 amplifier by the Richards Amplifier Company – Australia. Not the big 4 x KT66 85 watt monster of his, but the very recordable 28 watt custom design. Bob was actually our very first customer who appreciated what the KT66 power output valves could offer (with the right choice of output transformer) in performance and tonality, as compared to other alternatives.

RAW BRIT 2008 001Pedals employed in the recording of this album include our very own Treble Meister, an enhanced Class-A NPN midrange/treble booster pedal, plus an old favourite – the Rich Drive (Bob was the first customer for this overdrive pedal, back in 1997), plus our all-time best seller – the Rich Blues which delivers Bob the extra mids he likes for soloing.


Thanks for checking out our blog again after a long break from writing – but we have heaps more material to publish regarding custom amp builds and interesting amp repairs, so please check us out on a regular basis.

Regards, IR.


Ivan’s Belman ‘Albatross’

August 2, 2014
Belman Albatross

Belman Albatross

Thanks for checking in to our blog. From time to time we like to share our experiences in upgrading our own instruments, as distinct from customer repair work. This week we discuss an Australian made instrument – the Belman Albatross (standard). The most recent similar blog was published November 24 2013, regarding a ’52 Tele (reissue) upgraded with the marvellous  Pete Biltoft pickups, plus an upgrade of an ESP Tele. We purchased the Belman at the beginning of this millenium from East Gosford Music (NSW). The proprietor, Trent Crawford, was one of the first stockists in NSW (as far as we were aware) of the Belman guitar and was a Belman player himself.

Belman Albatross

Belman Albatross

Trent enthusiastically promoted the Belman, and quite a number of local Central Coast players (including myself) purchased the Albatross and subsequent models such as the double-cutaway. The thing that struck us all was the consistent quality of construction and assembly of these instruments, especially when making direct comparisons to the leading imported brand (at that time), selling for twice the price or more. Another unique aspect of the Belman was the use of exotic Australian tone woods.


Belman headstock & logo

Belman headstock & logo

Belman guitars were hand-made in Melbourne, Australia from 1994 to 2007. I recall visiting their factory in Thomastown (Victoria) in the company of Bob Spencer, who was in the process of ordering a customised model. Belman was only ever a small operation, involving just a handful of people. Like many such small businesses in a highly competitive industry, they were under-capitalised and had no choice but to stop production in early 2007. For a more in depth discussion of the Belman models – see the Jedistar Belman Page. East Gosford Music also closed their doors a few years back, due to the shift in musical instrument retailing from bricks and mortar to on line. Trent, however is still very much involved in the music industry – see Trent Crawford Music.

location of the serial number

location of the serial number

With the Belman Albatross – I always thought that the electronics let the guitar itself down very badly. The pots, 3-way switch and jack socket were all just a bit cheapo, and were upgraded to Switchcraft and CTS components a.s.a.p. All the other Belman hardware was excellent. We don’t understand the reasoning behind these choices, as the RRP of the Albatross at that time was $2,399 ! Please note: when replacing cheapo guitar pots, the mounting holes will usually have to be carefully enlarged to 3/8″ diameter with a suitable reamer.

rear view with EGM sticker still in place

rear view with EGM sticker still in place

I was never happy with the high output pickups either, and didn’t feel that they were bringing out the best in this instrument at all. This particular issue of course applies to thousands of guitars out there, a fact which supports a whole after-market guitar pickup industry. Next, I installed a set of Lindy Fralin humbuckers which also were too hot and therefore too muddy. I probably should have researched my requirements a lot more, as Lindy Fralin offer many choices from underwound to overwound. I went through a P90 obsession phase, and installed a set of Seymour Duncan Phat Cats, which are P90 pickups modified to install in a standard humbucker mounting.

new Seymour Duncan neck humbucker

new Seymour Duncan neck humbucker

I still wasn’t getting the combination of warmth/sweetness/clarity/articulation that I was craving so badly by now. I knew the problem wasn’t the guitar itself – the solution could only be achieved by matching up the right choice of pickups. Last year I upgraded the neck pickup in my ESP Ronnie Wood Telecaster (also purchased from EGM), with a Seymour Duncan ‘Seth Lover’ humbucker, with the best results so far in that guitar, paired up with the ‘Jerry Donahue’ bridge pickup (both Alnico II). I ordered a set of Seymour Duncan ‘Seth Lover’ pickups, SH-55b (8.07K) and SH-55n (7.33K), from a dependable supplier Darren Riley, for around $100 ea USD.

I could have spent well over $400 AUD acquiring the new Joe Bonamassa signature pickups, or some other more exotic boutique models, but exercised some restraint and I’m pleased I did, because these pickups have worked wonders for my Belman which now has mucho warmth without compromising on clarity, and the amp can be easily cleaned up from the guitar volume control, which is always a good thing. The tone is vintage PAF to be sure, but these pickups can still supply enough boldness and punch for most applications short of heavy rock and metal. IR.