Archive for the ‘Amps’ Category

Service Centre for Morgan Amplifiers in Australia

January 16, 2013
the Morgan SW50 head

the Morgan SW50 head

Many of you will already know that for many years now we have specialised in the repair, service & restoration of hand-wired valve (tube) musical instrument amplification, including many of the “boutique” grade amps that have appeared on the scene since the 1990’s. This is our first customer repair job for a relative newcomer to the “boutique” scene, the Morgan amp from California.

rear view - Morgan SW50

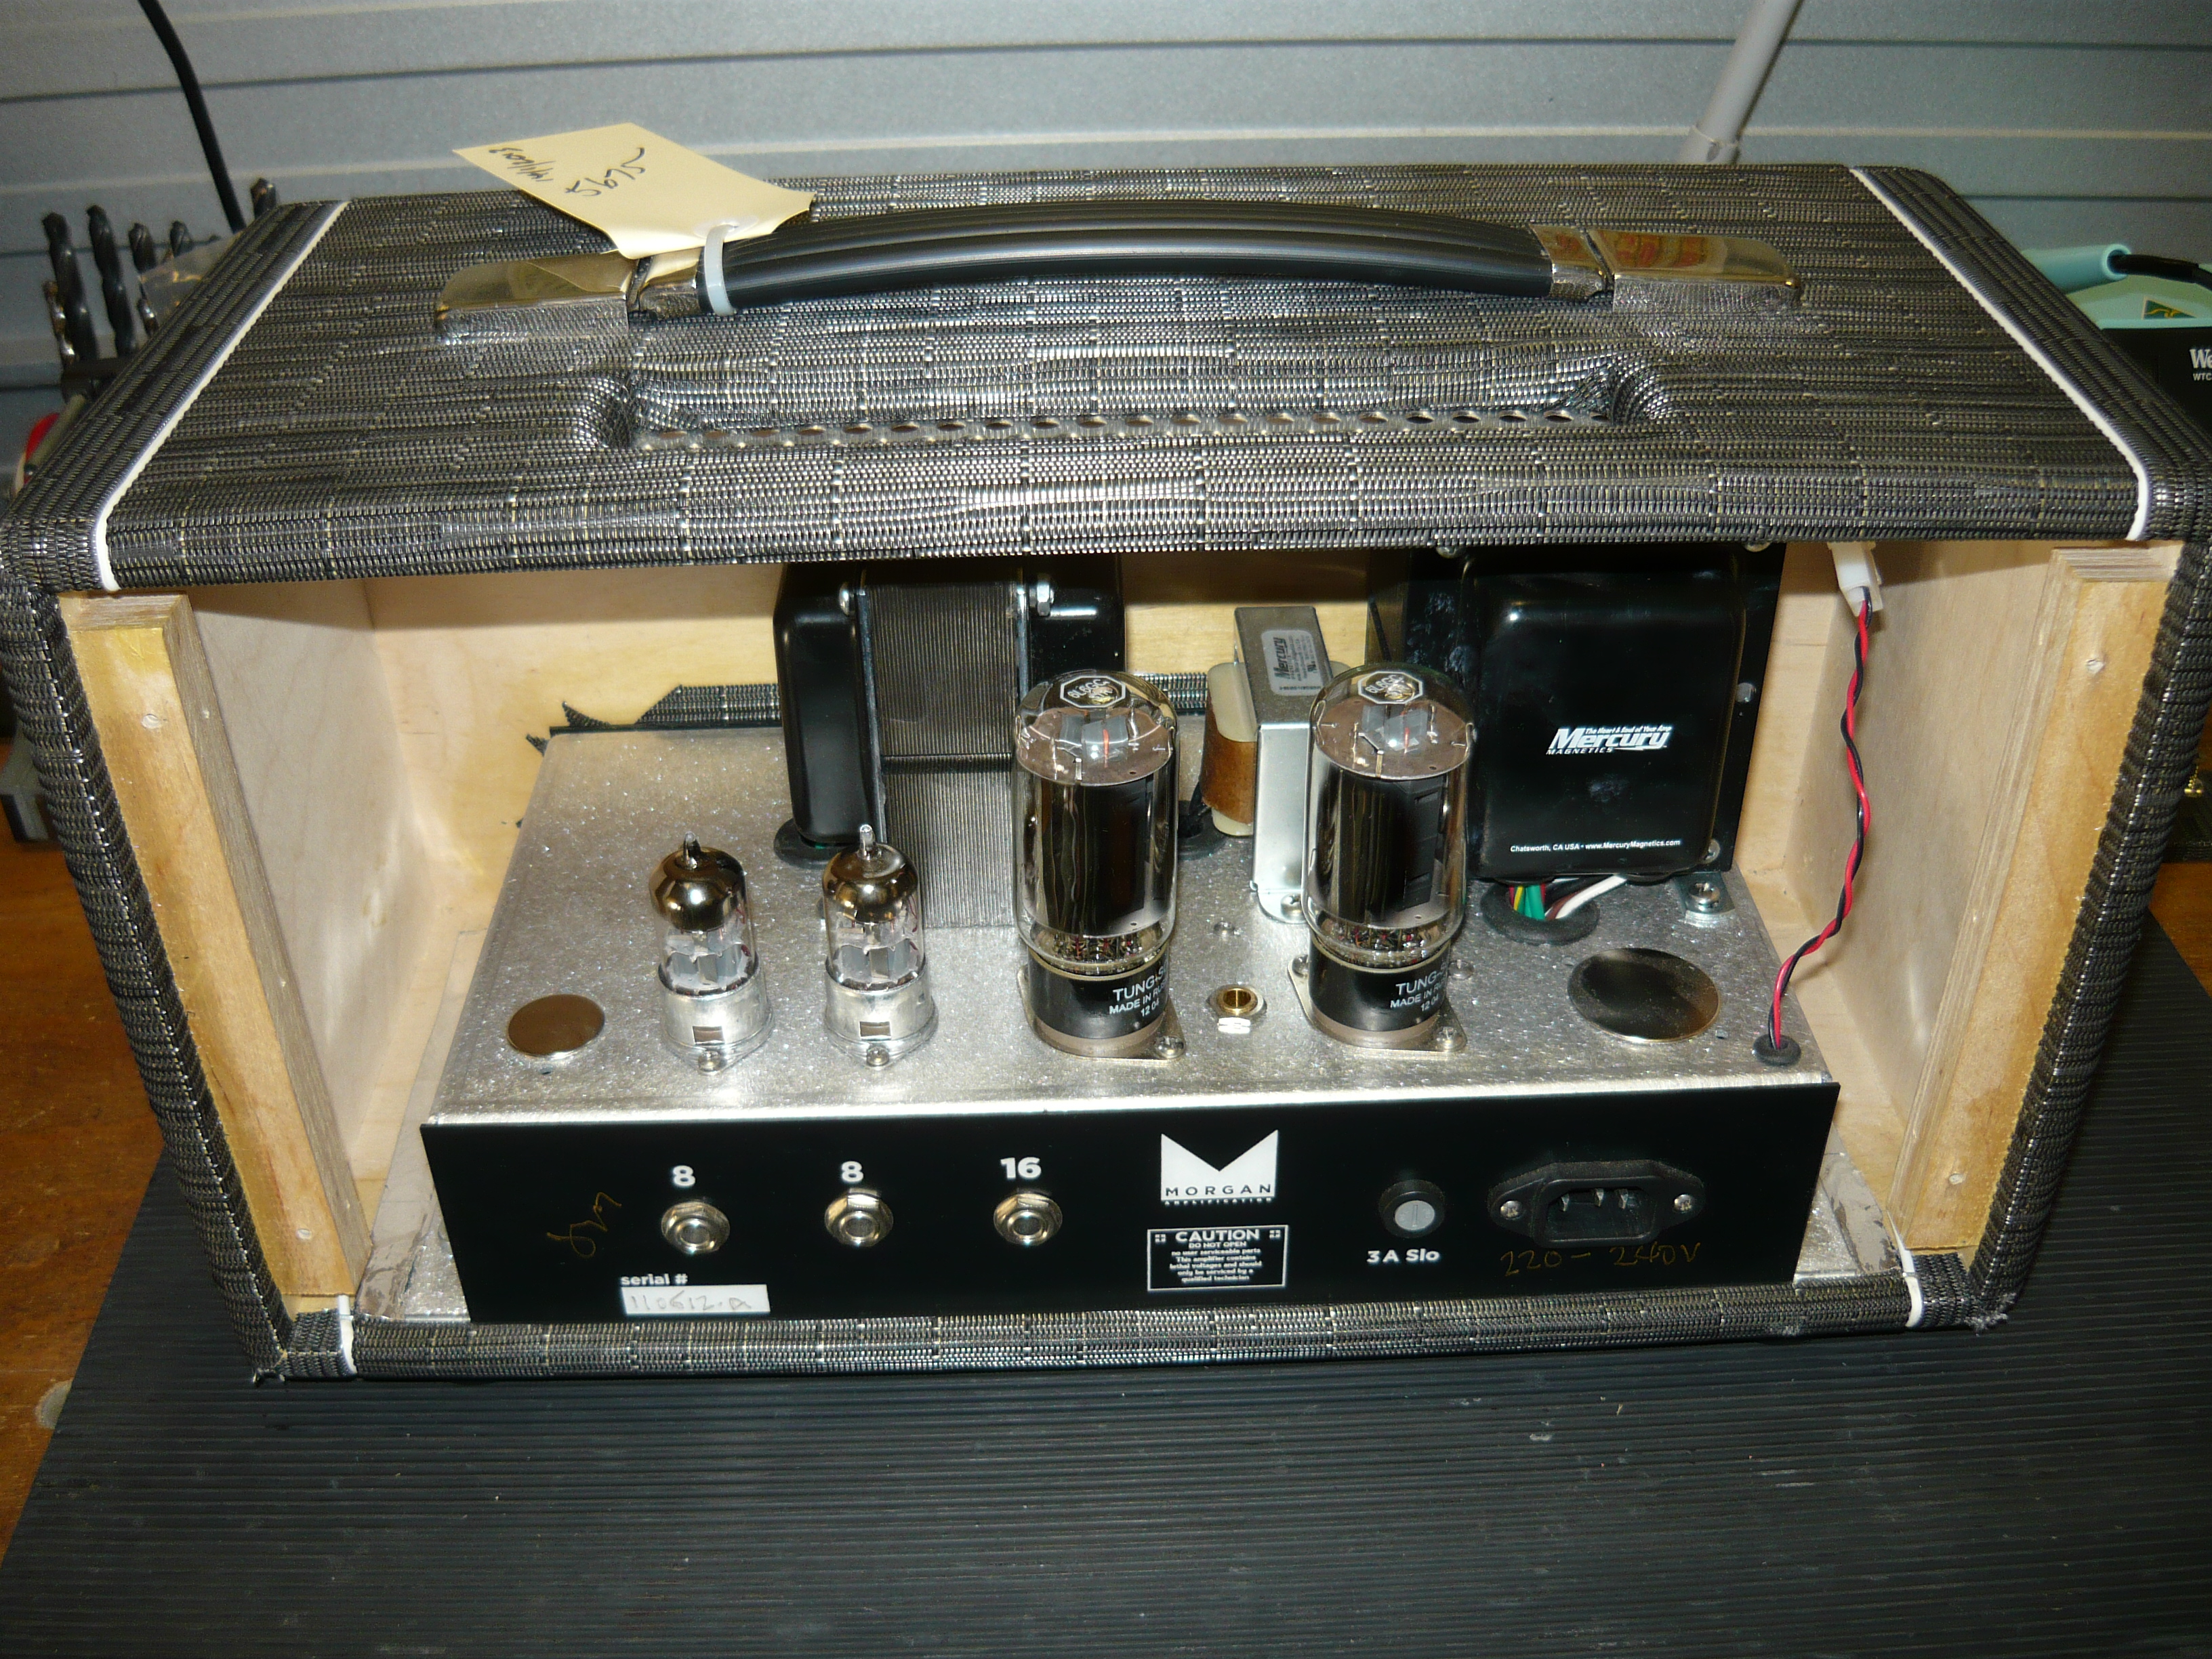
rear view – Morgan SW50

The Morgan amps have enjoyed an increased profile in recent times, and have appeared in numerous YouTube demonstrations. This particular model is known as the SW50, and is a stripped-down, single channel dual 6L6 powered amp delivering approx 45 watts @ the onset of clipping. The power supply is quite conventional, employing silicon diodes for rectification. The transformer & filter choke set is by Mercury Magnetics.

rear panel removed

rear panel removed

The Morgan website implies that the design of this model is loosely based on the clean channel of a customer’s early 1970’s Dumble amp. Clearly, the design was revoiced & refined quite significantly to become the SW50, which is primarily a clean, percussive amp with very late break-up. The 2-band EQ is more interactive than a “Blackface” Fender, for example. The bright switch is very effective at low settings of the volume control, the bass switch is obviously Dumble inspired but unfortunately primarily boosts very low frequencies and is best left off.

top/rear view of SW50 chassis

top/rear view of SW50 chassis

The SW50 is actually quite dark running with the volume control set high and the level (ie, master volume) set low. Conversely, the SW50 is quite bright with the volume control set low, and the level set high – this is when the bright switch is most effective. There is more than enough bottom-end with the bass switch off. The preamp employs a single JJ 12AX7 valve (tube), plus a 2nd JJ 12AX7 for the phase-inverter stage.

chassis interior view 01

chassis interior view from front

This particular Morgan was creating some weird resonances on selected notes being played. We discovered that V1 was microphonic, and the pair of SED 6L6GC output valves (tubes) was in very poor condition, with a much weakened internal structure vibrating at selected frequencies. The amp was under-biased, meaning that the 6L6’s were running far too hot for long term reliability.

chassis internal view from rear

chassis interior view from rear

We installed selected replacement valves & rebiased for a more reasonable current draw. On power output test there was no crossover distortion evident and we measured 19V/8 ohms which is 45 watts, @ the onset of clipping. Mains voltage here in Wyoming NSW is approx 245V AC. I should point out that at this point in time we have no official relationship with Morgan amps, we are not an authorised warranty agent. However, we are now offering world-class non-warranty service/repairs to all Morgan amps for Australian customers. Regards – Ivan Richards.

Dean takes delivery of his Blue Mood 18W custom amp

December 10, 2012

Mr Dean Gardiner, the brother of Jonny Gardiner (proprietor of the Rock God Music School, situated around the corner from us here in Wyoming NSW), recently took delivery of his Blue Mood 18W 6V6 amp head, by the Richards Amplifier Company – Australia. Naturally, when the day came for Dean to pick up his new amp, we took it around to the music school auditorium, so the two brothers could give it a good blast.


Dean Gardiner 18W Blue Mood 002The photos show Dean’s new Richards amp sitting on top of Jonny’s favourite well played in Marshall 4×12 speaker cab, but we demo’d the amp through a variety of differently voiced speakers. Some amps only sound at their best when connected to specific models of speaker, but this amp sounded great connected to any speakers we had access to. We originally discussed the assembly and design concepts of this amplifier in some detail in our earlier blog dated July 17th, 2012. There are two important details that differentiate this example of the Blue Mood series amps from other custom orders, apart from the choice of 6V6 output valves.

Dean Gardiner 18W Blue Mood 003Firstly, this amp includes the optional extra of a valve-driven FX Loop, please see the original blog. Secondly, Dean chose the Mercury Magnetics reproduction of the original Fender “Brownface” DeLuxe 6V6 audio output transformer. This transformer has only a single 8 ohm secondary winding, so there is no impedance selector on the rear panel as per most models. However, this limitation is more than compensated for by the trademark Mercury sound that is smooth, exceptionally musical, warm and balanced. Sweet, rich, detailed and seductive !

Dean Gardiner 18W Blue Mood 004So………………what is the intention of the Richards Blue Mood series amps ? To equal or surpass the tones of the great late 50’s tweed and the early 60’s blonde and brownface guitar and bass instrument amplifiers. The Blue Mood gives you finer control over your tones and less power supply noise than the originals. The amps are designed around 6V6 or 6L6 power amp stages, although we do also build a 30 watt EL34 model with a more ‘British’ voicing, as a tribute to the great TW style amps. In the latter case, the control panel and chassis layout remains unchanged. The EL34 model will be the subject of a forthcoming blog. Regards – Ivan R.

Steven and Peter: custom amp build progress

December 9, 2012

Here is another in our occasional series of blogs where we publish a visual progress report of a custom-order amp build. In this case we have two customers, Steven and Peter, who have ordered exactly identical amps and cabs, except for the choice of speaker grille material.

The photos show a Blue Mood series amp chassis being assembled, this time rather than 6V6 output valves and a power output of 12 to 18 watts, we are building a pair of amps of about 40 watts output, employing the 6L6GC output valves as reissued by New Sensor under their Tung Sol brand.

These amps are a customised variation on the Blue Mood concept, with the addition of fully-featured valve (tube) driven FX Loop. The Loop features separate Send and Return level controls, as well as separate Send and Return buffer stages. Obviously the Return buffer stage can be configured as an additional gain stage, or purely just to balance the wet signal against the dry signal.

The FX Loop can be activated or bypassed by means of a toggle switch mounted on the front control panel. There is no need to be messing around at the rear of the amp in the middle of a gig or session. This Loop switch provides true hard-wired bypass for maximum transparency. The Loop can also simply be patched back into the Return jack for use as an additional gain stage.

We can draw on 20+ years experience retrofitting valve-driven FX Loops to JCM800’s and 4×10 Bassman reissues, for example, when designing a custom amp as shown here. This might be a good opportunity to outline our philosophy on FX Loops in guitar amplifiers. We choose to implement a valve (tube) driven Loop over the alternatives every time ! The primary issue when designing a Loop, apart from achieving the desired levels of transparency and headroom, is obtaining broadly the same tone from the amp, regardless of whether the Loop is in use or not.

Mercury Magnetics ToneClone transformers & chokes

Mercury Magnetics ToneClone transformers & chokes

This is what most players would expect – most players don’t want a different sounding amp when the Loop is in use, from when the Loop is not in use – they don’t want some radically different tone. Our philosophy is that the design of the FX Loop, and therefore its tone or sound, really should be an extension of the design and sound of the preamp itself, and not a departure from it.

Blue Mood 1x12 cab in blonde with oxblood grille

Blue Mood 1×12 cab in blonde with oxblood grille

You can see from the photos that we have installed toroidal power transformers by the great Harbuch company of Sydney, for less weight and less radiated noise, plus ToneClone filter chokes and 40W audio output transformers from Mercury Magnetics, arguably the world’s best known supplier of specialist guitar amp transformers.

Blue Mood 1x12 cab blonde with wheat grille

Blue Mood 1×12 cab blonde with wheat grille

Our final photos show the matching 1×12 Tone Cabinets as supplied with these two amps. As we said at the beginning, both customers ordered cabs covered in blonde tolex, but whereas Peter favoured the oxblood grille material, Steven favoured the wheat grille. Both customers requested alnico-magnet 12-inch speakers by Weber, and these are actually the perfect speaker for these amps.

Blue Mood 1x12 cab in blonde (rear)

Blue Mood 1×12 cab in blonde (rear)

Well, in closing we should probably remind you that we are in fact from March 2012 an authorised Mercury Magnetics Service Centre, meaning we are factory authorised to supply and install all Mercury Magnetics products in your amp. We are also happy to install MM transformers as supplied by you.

Blue Mood 1x12 cab in blonde (rear)

Blue Mood 1×12 cab in blonde (rear)

Mercury Magnetics designs and builds the largest selection of both replacement and upgrade guitar amp transformers in the world. So we are now in a position to assist with the choice of a suitable transformer and provide fastrack tech support, plus you have the reassurance that your new transformer will be installed to the highest electrical safety standards. If you have any questions re our amps or MM transformers, please contact us at: info@ivanrichards.com

VHT Pittbull Classic

December 7, 2012

Hello and welcome back to the blog after a break of several weeks. This time we are looking at a classic hard rock guitar amplifier from the USA, manufactured back in the early 1990’s: the VHT Pittbull amp. This example has obviously had a hard working life, and our repairs actually started with the cabinet, which was beginning to fall apart. The stated fault from our customer was there was a pop, then nil output. No fuse had actually blown, and all the valves tested OK, so the problem was in the circuitry itself.

All of the circuitry in the Pittbull is mounted on two large printed circuit boards (p.c.b.’s) which run pretty much the width of the chassis. Unfortunately, they overlap and things are complicated by the board mounting arrangements, so it is a very time consuming job removing these boards for repairs, plus it’s fiddly, with the ever present danger of introducing additional faults that weren’t there in the first place. Even worse, the status LED’s that indicate which channel is active, are mounted below the boards where your fingers can’t get to them to line them up with the holes in the front control panel.

Examination of the boards didn’t reveal any obvious component failure, but a check of the DC conditions with a DVM indicated problems with the low-voltage (LV) power supply, ie the +/- 18V DC rails (regulated). Apparently the signal path includes some solid-state circuitry, hence the complete loss of signal, and there is also some switching/control circuitry which is IC based. Unfortunately all the device identifiers have been intentionally rubbed off the IC’s ! The original VHT company definitely didn’t want to make servicing their products any easier than necessary. This is a design approach that we have never ever understood or endorsed.

VHT Pittbull 004A silicon diode, part of the bridge rectifier for the LV supplies, had gone short-circuit, also causing the failure of filter capacitors and a regulator IC. We replaced the identified components, and also upgraded a few electrolytic capacitors while we had the board out. The LV supplies were now completely functional. As part of our routine electrical safety checkover, we noticed the mains fuseholder was wired incorrectly – strange to find such a basic error in a modern amplifier. We reversed the fuseholder connections and carried out a PAT test, and this amp now complies with Workcover NSW electrical safety standards.

VHT Pittbull 005Having reassembled the chassis and reloaded the valves as supplied (with a very necessary rebias of the output stage – running too hot), the amp was given a power output test. This amp is quite a monster, with 540V DC supplied to the anodes of the EL34 output valves (like some very old Marshalls). We measured 35V into an 8 ohm dummy load which equates to 150 watts ! This is pretty impressive, considering the amp claims to be 100 watts. A burn-in test revealed no further problems, and the final play test showed this amp to be a much more versatile beast than you might have assumed.

VHT Pittbull 006As a sweeping generalisation, we have found the “clean” channel in multi-channel switching amps to be a real disappointment, with all the emphasis placed on the high-gain performance at the expense of clean and crunch tones. In this Pittbull Classic model, the three channels each offer two modes or gain levels and all the settings are useable. The “lead” and “crunch” channels do admittedly share the same EQ, but the very useable “clean” channel, with its own dedicated EQ, more than makes up for this compromise. Rock on ! Many thanks to Joss for supplying us with the subject matter for this blog. IR.

MOD for the David Eden WT800 bass amp

October 9, 2012

We discussed in a much earlier blog that we provide service & repairs for the David Eden brand of bass amplification. In today’s blog we are showing the “World Tour Series” WT800 model as an example, but this blog probably applies to most of the range at this time.

We recently implemented a MOD to this amp at the request of our good customer, Mr Paul Disspain. We can’t claim any originality for this as the idea came from an example on the David Eden user forum. Initially we thought the idea was a bit overkill, but now wholeheartedly agree this is a MOD that greatly enhances long term reliability.

Commercially made amplifiers often have little design short cuts or oversights where the design team momentarily dropped the ball, and David Eden is no exception. Specifically, the low voltage power supply in this model has been done “on the cheap”. Rather than design dedicated low volts supply rails from their own transformer winding, the design simply drops the power amp volts supply rails by way of inserting series resistors, designated R62 & R64.

The end result of this technique is that the voltage dropping resistors generate a LOT of heat, even though R62 & R64 each comprise a pair of 5 watt ceramic body components. We are talking about enough heat to desolder the connections over a period of time. This heat is constant, the whole time the amp is powered on. The resultant poor connectivity gives rise to intermittent faults – not necessarily a total loss of signal, but unpredictable drops in signal level and functionality which mysteriously correct themselves.

The intention of the MOD is to get the low voltage supply dropping resistors off the printed circuit board altogether. No more heat being absorbed into the board represents a big improvement in reliability. The next obvious step is to up the power dissipation rating of the resistors. If we use aluminium clad resistors, then these by design are suitable for mounting onto a heatsink. A pair of 15 watt resistors each for R62 & R64 (ie, four in total) mounted to an aluminium heatsink, suitably mounted to the bottom section of the amp chassis, in the space between the front board and the toroidal transformer will require only short lengths of hookup wire to connect back to the board.

You can see in the photos that we have to strip out the front board completely from the chassis. Removing & replacing the printed circuit board without introducing any additional problems is a time consuming element of this work. We need access to the solder side of the board to clean up any problems, remove the old solder and possibly repair any heat damaged tracks & pads.

While we have the board out of the way, we can mount the heatsink, taking care to leave enough clearance to actually be able to reinstall the board. This task is fiddly enough as it is, without the resistors in the way. We don’t want the heatsink hard up against the transformer or the interconnecting wiring.

The final photos show the board reinstalled and the interconnections between the aluminium clad resistors and the former positions on the board for R62 & R64 completed. The final arrangement still creates some heat, but nothing at all like the original design. With one channel only driven into a 4 ohm resistive load at a time, the power amps deliver 480 watts, which translates into a nominal 400 watts per channel with both channels driven into 4 ohm loads.

The whole job takes at least 2 hours to complete. It is a worthwhile improvement in reliability for those owners of the original David Eden amplifiers who intend to keep their amps for the long term.

Gary takes delivery of his Blue Mood 18W combo

September 22, 2012

Our good customer Gary recently took delivery of his new Blue Mood Series 18 watt reverb 1×12 combo from the Richards Amplifier Company – Australia. As you can see in the photos, this combo is just stunningly presented in a cabinet built from a central section of Tasmanian Blackwood, with Bird’s Eye Maple edges. The 1×12 speaker baffle is furniture-grade Fiji Cedar ply, although this is covered in a plain black grille material for contrast.

The exotic timbers cabinetwork is done for us by our good friend and colleague, Mr Peter Davies, who is formerly of the NSW Central Coast, but now resides in Melbourne. This combination of Tassie Blackwood and Bird’s Eye Maple represents the most attractive combination for our amps we have achieved so far, although Peter tells us he is working on something even more eye catching !?!?

Any of the amps and speaker cabs that appear on our blog site can be ordered with conventional “tolex” coverings, available in a variety of styles and colours, over a furniture-grade plywood cab. This particular 1×12 combo was supplied loaded with a Celestion 70th Anniversary Series G12H30, a speaker that sounds very good with most amp designs.

We don’t imagine that Gary will be taking this amp out on the road, it’s more the kind of amp that you enjoy in the privacy of your own home. The combo features a pair of high impedance inputs, a bright switch for guitars with humbucking pickups, volume, treble, middle, bass, reverb and master volume controls, footswitch jack and send & return jacks for the passive FX Loop.

So – what makes this 18W combo different from the other models in the Blue Mood range ? For one thing – this model is all about the reverb. The reverb is warm and lush, not the thin and insipid reverb that we hear in so many commercially made amps nowadays. Naturally, we employ a full size reverb tank, housed within a double bag to minimise coupling from the nearby speaker. The reverb does not add any hum, noise or power supply hash to the dry signal. The sweep of the reverb level control is useable from minimum to maximum – we don’t concentrate the entire sweep of this control into just a few degrees of rotation !

Primarily, this model is designed for transparency, with the added bonus of the warmth and harmonic complexity that only a well-designed valve amp can deliver. The master volume control is intended more to control the gain structure of the amp, and is less about overdriving the preamp easily. In other words, the player can find the desired sweet spot when setting the volume, treble, middle, bass & reverb controls, then set the appropriate playing level with the master.

The footswitch jack offers a boost facility for solos, etc, achieved by partially bypassing the passive EQ, ie the tone stack. A robust footswitch pedal is included. The FX Loop is positioned after the master volume, between preamp and power amp and is completely passive to maintain the transparency of the amp design. This will require the use of a professional quality (line level) time delay outboard FX, which offers a high input impedance plus input & output level controls with LED signal level indication.

Feedback from Gary so far – well, all of our customers love their Richards amps, but we have never before received such a warm & enthusiastic response as we have over this amp. Gary realises that this amp is making him a better player – the transparent nature of the amp means that it doesn’t hide any mistakes or sloppy playing, so you just end up playing better. The warmth and sheer tone of the amp means that you can play for hours on end and never want to stop. Even Gary’s wife has noticed the improvement. We think we have achieved something extraordinary here !

Well – we will probably only ever build just a handful of this particular model. Our most popular models are the British voiced Expressionist and Rich Tone amps, with good reason, but we have certainly proved a point with the 18W reverb combo. Many thanks to Gary for his enthusiastic response to this amp – IR.

Brent’s vintage DIASON amp

September 16, 2012

Welcome back ! This week we have another curiosity item from the distant past. We are discussing a vintage Diason 15 watt guitar amplifier, serial # C1048, belonging to Brent, from Bondi Intermusic, our favourite Sydney boutique guitar store. We know very little about Diason amps, we’re not even sure how to pronounce “Diason”, but we know they were manufactured in Melbourne Australia, back in the 50’s and 60’s.

Once again, if anyone out there has any knowledge regarding the manufacture of the Diason amp, please contact us so we can present this information to our readers. Our primary concern always is that the history of the Australian music industry is not lost forever. We have repaired Diason amps previously, usually from the mid-60’s, and always 1X12 combo’s of less than 20 watts output.

This stunning example is presented in a very attractive green covering material with contrasting speaker grille. Judging by the approach to construction of this amp, it is a fair guess that date of manufacture is in the late 1950’s, or early 1960’s at the latest. There are two channels with individual volume controls and a common tone control, a fairly standard format back in the day. There are separate chassis for the preamp and the power amp, also a standard format at the time, usually connected together by an octal plug and socket, but also by other methods.

The input jacks and controls face to the rear, which was perfectly fine at the time when dance band guitarists often played seated, with their amp in front of them. Fifteen watts was more than adequate for the job. We recall seeing amps just like this from Maton, Vadis and Moody, to name just a few, plus Fender, Gibson and Ampeg from the USA. The amp sounds quite good, by the way. Brent was intending to put this amp in his special room upstairs at Intermusic, with all the nice acoustic guitars.

Well, there wasn’t actually a great deal wrong with this amp – just a general service required. All the electrolytic capacitors were replaced of course – they were still the originals ! Plus a resistor that had drifted way off value. Electrical safety issues included the 240V 3-pin plug, and the fuse. The single biggest problem was the pots were so scratchy, the amp was barely useable. A good squirt with Caig Faderlube restored them to good working order, replacement not required. They made things to last in the old days !

You can clearly see from the photo on the right the arrangement of the two separate chassis. The hefty Aussie power transformer is mounted at the end of the chassis, well away from the 12-inch speaker which takes up most of the internal space within the combo. The audio output transformer is mounted to the chassis of the speaker itself, also a common arrangement back in the day. The captive 240V power lead usually has a space to be curled up underneath the power amp chassis.

The speaker is mounted slightly offset, possibly to balance the weight and also possibly to create space for the power transformer. You can see on the left that the speaker manufacturer’s label and the stamp for model number and impedance have survived. The alnico-magnet speaker was manufactured by MSP, a division of AWA in Sydney. MSP = Manufacturers Special Products. The MSP speakers were standard equipment in many Australian-made guitar amps. AWA also manufactured valves (tubes) in another division called AWV (Amalgamated Wireless valve).

Most, if not all the valves (tubes) in this Diason appear to be original. Apart from the made-in-Holland EL84 output valves (labelled 6BQ5), they were all made-in-Australia. The photo to the right shows the 5Y3 rectifier valve, labelled Philips Miniwatt. Miniwatt was the division of Philips that manufactured electronic components, for example capacitors, as distinct from consumer products. All these valves are still working fine after 50+ years !!

Obviously we were manufacturing very high quality valves (tubes) right here in Sydney, at the manufacturing facilities of both AWA and Philips. That’s another Aussie manufacturing skill that’s disappeared, unfortunately. We remember buying a carton of 12AX7’s from AWA in Ashfield at the beginning of the 1970’s, which lasted most of that decade. Each and every one of them was excellent, and they didn’t require individual testing and grading, which is what we have to do now.

Anyway – back to the Diason general service, we completed the job and invoiced Brent for 1.5 hours labour plus a handful of components. Not a huge investment required to get this amp running at its best, with a check on electrical safety as well. Whether or not anyone actually plugs an instrument into this amp, it will look just fabulous in the Intermusic acoustic guitar room.

The remaining photos are before and after shots, inside and outside of the power amp chassis. They are typical of the layout and construction style of the amps of that time. We hope you enjoyed this appraisal of yet another quite obscure vintage Aussie guitar amplifier. We have a bit of a backlog of material to publish, so please check in with us on a regular basis. Regards, IR.

Silverface Fender Champ

September 4, 2012

A Silverface Fender Champ amp, serial # A34003, date of manufacture August 29th 1972, was purchased on Ebay by Jessica, a young lady just starting out in the music industry here on the NSW Central Coast, and is the subject of this blog. This was a smart purchase on Jessica’s part, but required a major overhaul to bring the amp up to performance standard, which of course we were happy to do.

This amp was purchased off Ebay from the USA, so first and foremost we needed to replace the 110V power transformer with a 240V primary replica Champ transformer, plus install a 240V 3-core power cable and a 3-pin plug, including the installation of a dedicated chassis earth connection. The fuse also needed to be changed to a suitable value for 240V operation.

Next item on the agenda was the speaker – the original 8-inch alnico magnet speaker was doing this amp no favours at all. There are replacement/upgrade speakers for the Champ available from Jensen, Weber & WGS. We chose the WGS model, which is a significant upgrade compared to the originals. Seriously folks, WGS are making some great replacement and/or upgrade speakers at very competitive prices. We did have to enlarge the speaker mounting holes somewhat, to mount the new speaker on the existing bolts.

The Champ was now much louder and more toneful than the day it left the factory. There were just some relatively minor issues remaining to be corrected, ie noisy electronics. The pots and jacks were cleaned, as always, with Caig FaderLube and DeOxit. The power supply capcitors were actually 4 x 20uF/475V DC in a single chassis-mounting metal can. Fortunately, these capacitors are being manufactured again by CE Distribution (USA), so we were able to replace this unit, and maintain the original power supply design and appearance.

The photo on the left shows a capacitor that should be automatically removed before running these amps on the 240V mains. All that remained now to complete the overhaul, was to install spring clips to the octal valve sockets (to prevent upside-down valves from falling out), and to carry out power output and electrical safety tests. The amp delivered 4 watts into 4 ohms, at the onset of clipping.

The photo on the right shows you how we could date this amp so precisely – a Fender factory worker named J. Castillo date stamped the amp AUG 29 1972 ! regards, IR.

Victor takes delivery of his Blue Mood 12W head

September 4, 2012

Here is a new model in the Blue Mood series of amps from the Richards Amplifier Company – Australia. Utilising our smaller chassis size, and powered by a pair of 6V6 output valves, the Blue Mood amp is now available as a 12W head. In spite of the seemingly rather modest power rating, this amp is quite capable of holding its own with a bass player and drummer.

This example is presented in a stunning combination of colours – vintage style (British) purple tolex, and a front panel made from a selected piece of exotic hardwood – purpleheart. Black hardware, control panels and control knobs complete the picture. Those of you who are familiar with our amplifiers will know that we are particularly proud of the presentation of our amps in such beautiful timbers as Tassie Blackwood, Bird’s Eye Maple, Bubinga, and others – now including Purpleheart.

The basic Blue Mood format offers a stripped down circuit for purest signal path. A single high impedance input jack, volume control, passive treble/middle/bass controls, active prescence control, and master volume control with bypass. The bass control has a pull-shift function to shift the focus of the bass and midrange controls upwards by approx 1 octave, for an alternate vintage voicing. Rear panel offers 4/8/16 ohms impedance selection, a pair of parallel-wired speaker jacks, line/DI jack, a pair of fuses, detachable mains connection, plus a bold/vintage switch – in this amp the vintage setting reconfigures the 6V6 output valves for class-A/cathode-bias operation.

The basic tonality of the Blue Mood amp is inspired by everybody’s favourite early 1960’s amp from California, as exemplified by the Mark Knopfler’s, Stevie Ray’s and the Brian Setzer’s of the guitar world. We just go out of our way to make it a little fatter, a little warmer, and a little sweeter.

Each and every amplifier is individually hand-assembled, hand-wired, one at a time, by one person from beginning to end, to a specific customer order.

Another ZJM amplifier in our workshop.

August 31, 2012

Welcome back to the blog, everybody ! We haven’t published a new blog for about 6 weeks, but things have been rather busy at the Richards Amplifier Company – Australia. Well, it was quite a surprise when we were recently contacted by our very good customer Victor, to say that he had acquired a Vedette EL34 amplifier, built back in the 1960’s in Sydney by ZJM Industries.

This is the first ever Vedette amplifier that we have encountered, and only the third amp by ZJM, so not many appear to have survived. For a more detailed discussion of ZJM Industries, please check our blog dated June 26th 2012, titled the Challenge guitar amplifier.

The Vedette is loosely based on the FenderBlackface” amp designs, pre-reverb, but with EL34/6CA7 output valves and those big Aussie transformers that we noted with the Challenge amp. The sweep of the controls on the Vedette is a bit different, and the midrange is a bit bigger. The standout feature is probably the valve-driven tremolo, which gives the amp a lot of character.

While the EL34 & GZ34 valves had been replaced at a previous service, many important service issues had been completely overlooked. The photo to the right shows we replaced a couple of power supply caps that were well past their use-by date. The speaker jack & #1 input jack on the tremolo channel also required replacement. The tremolo didn’t work at all, which required a new 12AX7 plus a cathode bypass capacitor. The prescence control was no longer functional, as a result of someone’s experiment, and required rewiring.

But the most significant outstanding problem was that this amp was electrically unsafe to use ! We installed all new 240V 3-core cable & 3-pin plug, plus a fuse in series with the active (brown) lead, installed on the chassis rear panel, and also a dedicated chassis earth connection (not a shared connection). Now the amp is safe to use.

The wiring in the Vedette is pretty rough in places, and the sweep of the tremolo and eq pots is a bit frustrating for the user, with most of the action compressed into a few degrees of rotation. But, actually the amp works fine and also background noise is quite low, in spite of the random routing of wiring, which pretty much breaks all the rules for audio electronics.

Once again, we appeal to anyone out there who has some knowledge of the ZJM guitar and amp building enterprise in Sydney back in the 1960’s, to make contact and perhaps we could publish a more complete history. We will be back soon with a new blog publishing some photo’s of Victor’s new Richards Blue Mood series 12W 6V6 amp.