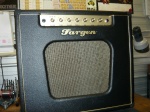
the Fender Pro Junior amp
Welcome back to the blog. Central Coast musician Justin – an established customer of ours, delivered to the workshop a very sick sounding Fender Pro Junior, which he had acquired on the ‘used’ market. These amps have been the subject of previous blogs, primarily from the point of view of upgrade MODs, which we will happily implement. This time we were confronted with a multiple fault condition scenario, which would require 3 hours bench time to completely resolve. Many of the problems in this amp were actually ‘introduced’ by some very dodgy ‘modding’ carried out by persons unknown to us.
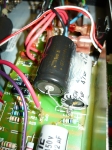
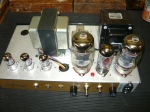
the main high volts power supply cap is leaking but left in circuit
The fault conditions presented to us were as follows – amp crackling & distorting, amp was much too bright to such an extent that it was only useable with the tone control on zero, the V1 12AX7 always behaved as if microphonic, even after being changed repeatedly. We removed and tested all 4 valves – they all tested fine and were actually relatively new. Starting from the power supply and working back from there, the 1st thing you notice is that the high voltage power supply ‘reservoir’ capacitor is leaking electrolyte, obviously faulty manufacture, and should be replaced altogether. Unfortunately, somebody simply wired in a new capacitor across the faulty one, which was therefore still in circuit. We removed that horrible mess and installed a 47uF/500V capacitor by F&T.
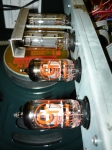
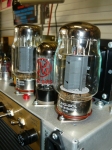
the Pro Junior valve complement
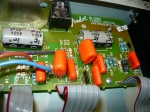
the 9-pin sockets were no longer doing their job
The next very obvious concern was that the 9-pin valve (tube) sockets (V1 to V4 incl.) simply were not gripping the valve pins adequately any more, and not making a true connection. This is possibly a contributing factor to why V1 always appeared to be microphonic. We have struck this problem before, in the Pro Juniors & Blues Juniors (also the Peavey ‘Classic’ Series amps), possibly heat build up in the valve socket board is resulting in sockets with a limited service life, compared to other amps. In any case, we replaced the 4 sockets with nice shiny new ceramic body sockets, with exactly the same dimensions, they are readily available and are probably what manufacturers should be using in the first place.
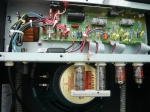
all signal path capacitors had been modded to ‘orange drops’ resulting in awful tone
And now to the pre-amp circuitry and the reason for most of this amp’s ongoing issues. This is already a bright amp. The original 10-inch speaker, presumably by Eminence, has been replaced by a Jensen (reissue) ceramic magnet model. There is nothing at all wrong with this model – it does the job, but it is seriously bright, and this needs to be taken into account before carrying out MODs to the amp circuitry. Unfortunately this principle has been ignored, and every single capacitor in the signal path had been replaced by an ‘orange drop’ capacitor, plus all resistors had been replaced by metal film types.
new 9-pin sockets installed
board has been repaired & replaced
The above-mentioned changes alone would make this a very bright & brittle sounding amp, but add a very bright speaker into the mix and the result is unbearable – hence the need to run this amp with the ‘tone’ control fully counter-clockwise. To make matters worse, virtually every capacitor change has resulted in permanent damage to the copper side of the board (PCB), with too much heat & heavy-handed soldering technique causing tracks & pads to lift off the board altogether. This is the reason for the amp’s crackling & intermittent performance. The chosen strategy was to leave the resistors alone and concentrate on the signal path capacitors.
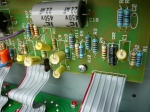
all signal path capacitors have been replaced with metalised polyester film
Each of the ‘orange drop’ capacitors was replaced with a metalised-polyester film cap, selected for it’s tried & true performance, based on previous experiences. In each case, the copper side of the board was restored to as close to original condition as possible, or else repaired with lengths of solid copper wire to complete the destroyed connections. One cap giving some H.F. pre-emphasis early in the circuit was deleted altogether, resulting in a more balanced sound (with this speaker). A total of 10 capacitors were replaced or deleted. The re-assembled amp was now completely stable with a good useable tone, within the limitations of a single tone control, ie there is no control over the bottom end or low mids. The Pro Junior tone control is quite powerful but limited to boosting or cutting the highs & upper mids.
In conclusion, working on printed circuit boards (PCBs) requires good soldering iron technique (plus a good temperature controlled iron), or else you are going to permanently damage the board, as was the case here. Best to practice by building a few kits or etc, before attempting to MOD valve amps. Amp modding has been going on for decades, usually to solve specific problems, or to add gain stages, FX Loops, etc. In recent times, the late Bill Machrone created a whole growth industry in amp modding with BillM Audio. Bill successfully targeted specific component upgrades to correct the original shortcomings in certain amp models, such as the Blues Junior. This focused approach makes complete sense, however the idea of replacing every single capacitor & resistor as suggested on some MOD websites is counter productive and prone to introducing problems that weren’t there in the first place.
Thanks for checking in to the blog. We continue to provide world-class service/repairs/MODs/upgrades/restorations to the Pro Junior, Blues Junior, Blues DeLuxe, Hot Rod DeLuxe, Blues DeVille & Hot Rod DeVille series of amps. Ivan R.